Band Stage Plot Example: Real-World Setup Case Study
Contact partnership@freebeat.ai for guest post/link insertion opportunities.
You’re standing in a dim load-in hallway, cases stacked, someone asks, “Where do you want the wedges?” and suddenly everything depends on what you can explain in 15 seconds. A stage plot example for band solves that moment before it happens—by telling the venue and engineer exactly where people stand, what gear lands where, and what needs power, mics, and monitor mixes. I’ve toured small clubs and shared festival bills, and the difference between “smooth soundcheck” and “why is the vocal feeding back?” is often a clear stage plot plus an input list. This how-to walks you through a practical case study you can copy.
What a stage plot is (and why venues keep asking for it)
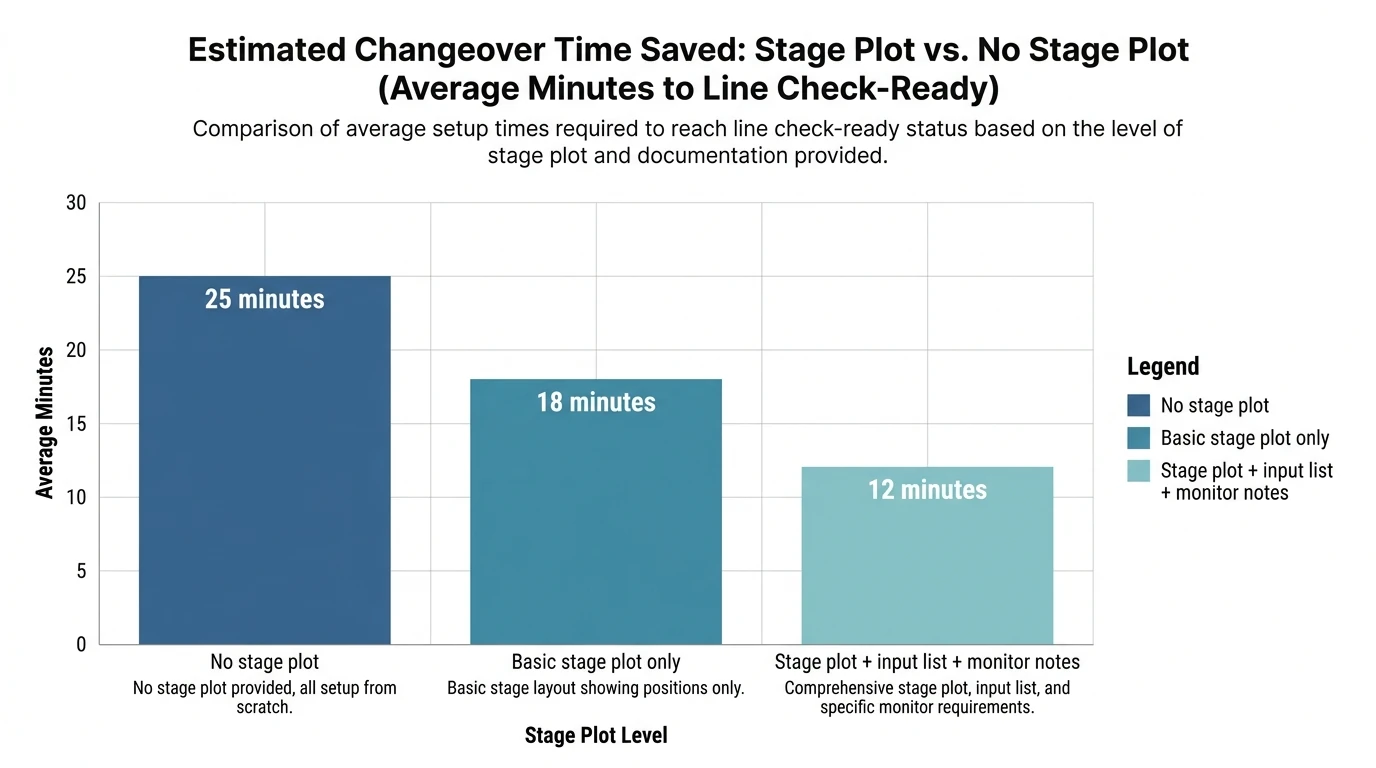
A stage plot is a simple diagram of your live setup: who stands where, what’s on the floor, and how it connects at a high level. It helps the sound crew pre-place wedges, mic stands, DI boxes, and power drops, which can save precious minutes during changeovers. According to DIY-focused touring guidance, using basic symbols (triangles for wedges, rectangles for amps, X-in-circle for mics) is more than enough to communicate clearly—no fancy art required (DIY Musician stage plot guide). A strong stage plot also reduces feedback risk because monitor placement and open vocal mic positions are planned, not guessed.
In practice, your stage plot should answer:
- Where does each musician stand (by name + role)?
- Where are vocal mics, amps, DIs, wedges, and power?
- How many monitor mixes (and who shares)?
- Who provides what (band vs house)?
For a more formal production view, NLFX Pro emphasizes pairing the stage plot with a detailed input list (including who provides each item) to avoid day-of surprises (NLFX Pro guide).
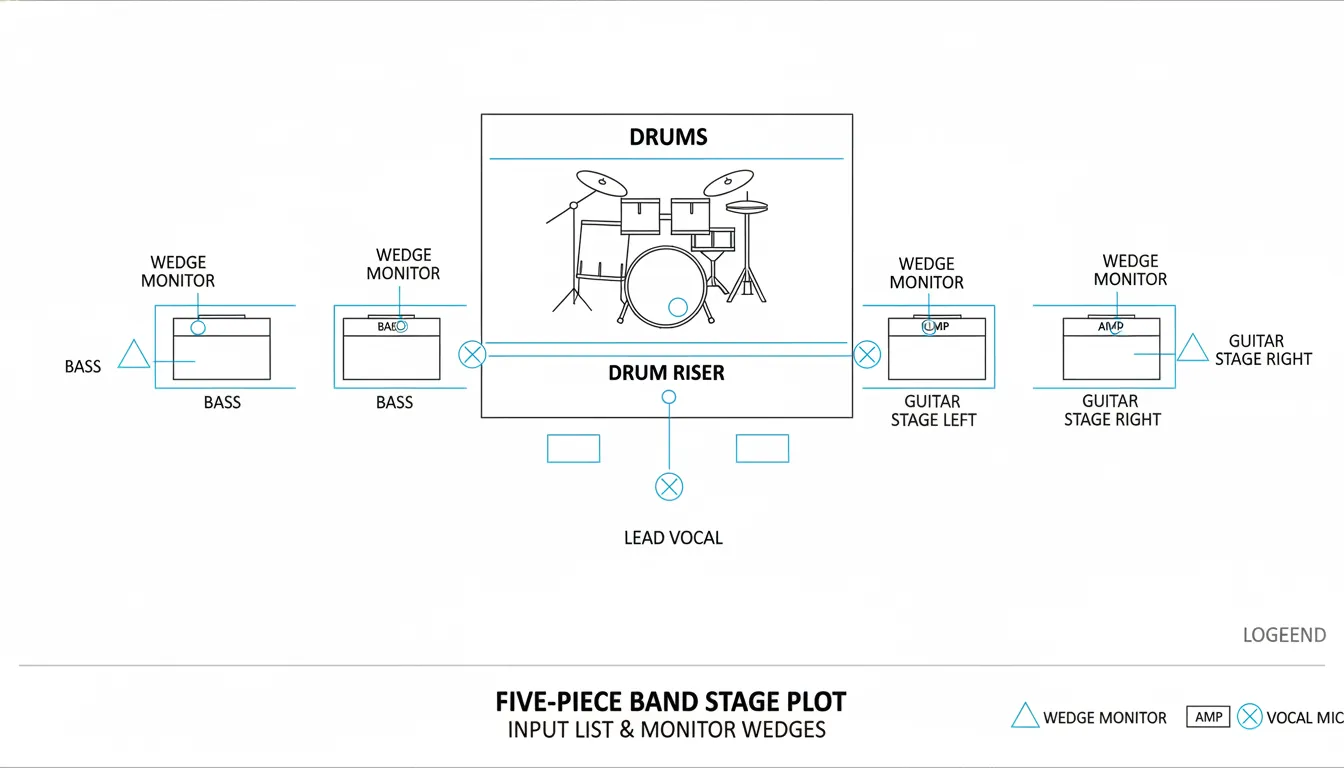
The real-world case study: 5-piece band on a tight festival changeover
This stage plot example for band is designed for a common lineup:
- Lead vocal (center)
- Guitar 1 + backing vocal (stage left)
- Guitar 2 + backing vocal (stage right)
- Bass (near drums for tight rhythm lock)
- Drums (upstage center)
I used a near-identical layout on a multi-band bill where we had a short line check, not a full soundcheck. The win wasn’t “perfect tone”—it was getting correct wedges, correct mic stand types, and correct DI placement on the first try.
Stage orientation (use this on every plot)
- Downstage = audience/front
- Upstage = backline/drums
- Mark Stage Left/Right from the performer’s perspective (not the audience).
Step-by-step: how to build your band stage plot (copy this workflow)
1) Sketch positions first (people before gear)
Start by placing each member as a labeled circle or name tag. Keep spacing realistic—especially around drums and mic stands.
Pro tip from the trenches: if your singer roams, still give them a “home” position so the engineer knows where the main vocal mic and wedge live.
2) Add “must-land-here” objects
These are the items that slow down a changeover when misplaced:
- Drum kit location (and riser if used)
- Guitar/bass amps (or note “all amp sims/DI”)
- Keyboard stand(s) if applicable
- Pedalboards (power needs!)
- DJ/loop station tables (power + DI + clearance)
StagePlot Guru’s practical advice is to keep the diagram simple, accurate, and easy to update—clarity beats detail (StagePlot Guru).
3) Mark microphones and DI points
Use consistent symbols:
- Vocal mic: X in a circle
- Amp: rectangle
- Wedge: triangle
- DI: small box labeled “DI”
Then label each input in a way that matches your input list (e.g., “Vox 1,” “GTR L,” “Bass DI”).
4) Add monitors (and note mix groupings)
Even a minimal note helps:
- “W1 = Lead Vox mix”
- “W2 = Guitar L + Vox mix”
- “W3 = Guitar R + Vox mix”
- “W4 = Drummer mix”
Engineers don’t need your full monitor wish-list, but they do need to know which wedges are separate mixes. If you’ve ever lost time rewriting monitor sends, you know why this matters.
5) Add power drops and special notes
Power is the silent show-killer. Mark:
- “AC” near pedalboards, keys, DJ/loop stations
- Any “no phantom power” or “requires phantom power” notes
- “Bass DI pre/post” preference (optional but helpful)
The stage plot layout (described clearly, so you can recreate it)
Downstage (front line):
- Guitar 1 + BV (Downstage Left): vocal mic + wedge + guitar amp
- Lead Vocal (Downstage Center): vocal mic + wedge
- Guitar 2 + BV (Downstage Right): vocal mic + wedge + guitar amp
Mid/Upstage:
- Bass (Upstage Right-ish, near drums): DI + wedge (or shares drum sidefill in small venues)
- Drums (Upstage Center): kick/snare/OH inputs + wedge or drum fill
This layout keeps vocals forward (cleaner gain before feedback) and keeps rhythm section tight.
Input list (the part that makes your stage plot “production-ready”)
A stage plot without an input list forces the engineer to guess channels, DI needs, and stand types. Below is a complete, club-and-festival-friendly example you can adapt.
Why this format works: It matches the best-practice “what it is / how to mic it / what stand / who provides it” approach used in professional guidance (NLFX Pro).
Monitor plan (simple, realistic, engineer-friendly)
Avoid paragraphs of “more me” requests. Use short mix targets:
- Mix 1 (W1) Lead Vocal: Lead Vox loud, some guitars, a touch of kick
- Mix 2 (W2) Guitar 1: Lead Vox, Guitar 1, some snare
- Mix 3 (W3) Guitar 2: Lead Vox, Guitar 2, some snare
- Mix 4 (W4) Drummer: Lead Vox, bass, guitars, click (if used)
If you use in-ears, put that on the plot: “IEM rack SR, stereo XLR L/R” and note if you need a splitter.
Everything You SHOULD KNOW about Stage Plots & Input Lists
Common mistakes (and how to fix them fast)
- Mistake: no “Provided By” notes.
Fix: add a column in your input list for Band vs House. This prevents “we assumed you had DIs” problems. - Mistake: cluttered drawings with gear art.
Fix: use basic shapes and labels. Your crew needs locations, not illustrations (a point echoed in DIY touring guides like DIY Musician). - Mistake: ignoring small-venue reality (backline too loud).
Fix: angle guitar amps across the stage and tilt them up when possible; it reduces the “guitars blasting knees” problem and helps the mix translate. This is a common small-room approach discussed in live-sound education content such as “mixing sound in small venues” (YouTube reference).
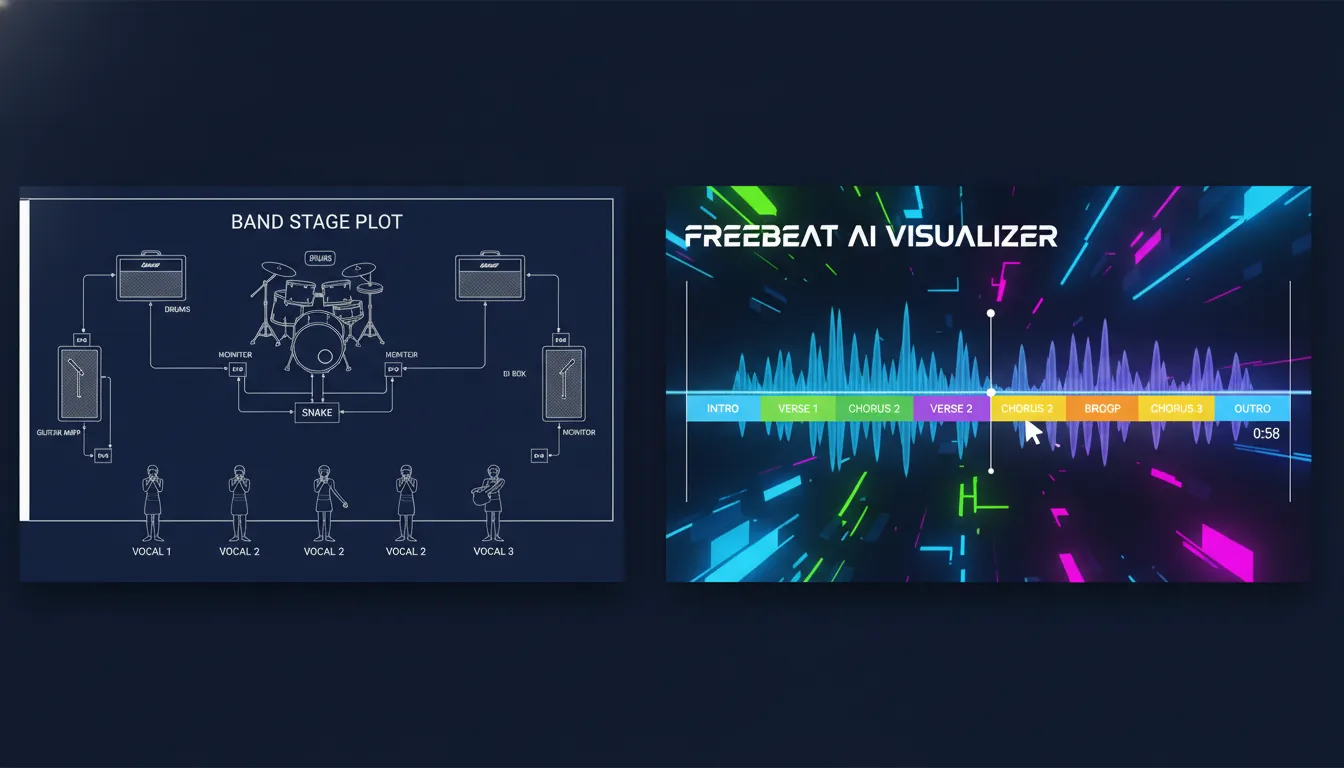
Pro tip: turn your stage plot into scroll-stopping promo content (Freebeat AI workflow)
A stage plot isn’t just for engineers—it’s a blueprint for visuals. When I tested performance-style content, the best short clips matched the song’s energy changes (verses, drops, choruses) with intentional cuts, not random motion.
Here’s a practical way to use Freebeat AI alongside your stage plot example for band:
- Map sections: Mark Verse/Chorus/Drop on your setlist audio (BPM and structure).
- Plan shots by position: Use your stage plot to pre-plan “lead vocal center,” “guitar left,” “drum upstage” coverage.
- Generate performance visuals: Freebeat’s audio-reactive engine can sync camera motion and transitions to beats/bars and section changes—useful for stage-performance visuals and lyric clips.
- Keep identity consistent: If your band uses a recurring look, Freebeat’s avatar/character consistency tools help maintain a recognizable on-screen persona across multiple videos.
If you’re building a content pipeline, start with your stage plot, then produce platform-ready music visuals with Freebeat AI and iterate weekly.
Quick checklist (send this with your stage plot PDF)
- Band name + date + contact phone/email (tech lead)
- Stage orientation labeled (Downstage/Upstage, SL/SR)
- Positions labeled with names + roles
- Mic/DI points labeled to match input list numbering
- Monitor wedges labeled by mix (W1/W2/W3/W4)
- Power drops labeled “AC”
- “Provided By” clarified in the input list
- Export as 1-page PDF and send as soon as the gig is confirmed (then again a week out)
For broader “tech spec” professionalism, it’s also worth reviewing venue-facing prep guidance from musician organizations like the Musicians’ Union tech spec/stage plot overview.
Conclusion: the calm, confident changeover
At the end of the night, the best feeling isn’t just applause—it’s looking back and realizing your setup didn’t steal energy from your performance. A stage plot example for band gives you that calm: fewer questions at load-in, fewer monitor surprises, and a faster line check. If you want, share your lineup (3-piece? 6-piece? tracks? IEMs?) in the comments and I’ll suggest a layout tweak that fits your venues—and if you’re turning live clips into content, try building your next release visuals with Freebeat AI to match your song structure automatically.
📌 animate your ideas plotagon freebeat
FAQ: stage plot example for band
1) What should a stage plot include for a band?
Include member positions, mic locations, amps/backline, DI points, monitor wedges (and mix groupings), power drops, and a contact person.
2) Do I need an input list if I already have a stage plot?
Yes. The stage plot shows where; the input list tells the engineer what channels and gear are required.
3) How do I label stage left and stage right?
Use the performer’s perspective: Stage Left is the performer’s left when facing the audience.
4) How many monitor mixes should I ask for?
For most small-to-mid gigs: 2–4 mixes is realistic. Note which wedges share mixes to simplify.
5) What’s the simplest stage plot that still works?
A clean diagram with names/positions, three vocal mics, drum position, amp locations, wedge count, and a short input list.
6) When should I send my stage plot to the venue?
When the show is confirmed, then again closer to the date (especially if anything changed).
7) Can a stage plot help with video planning?
Yes. It’s a shot map. You can pre-plan angles and then use audio-reactive tools like Freebeat AI to sync edits to beats and sections.


