Professional Stage Plot Design Checklist for Live Shows
Contact partnership@freebeat.ai for guest post/link insertion opportunities.
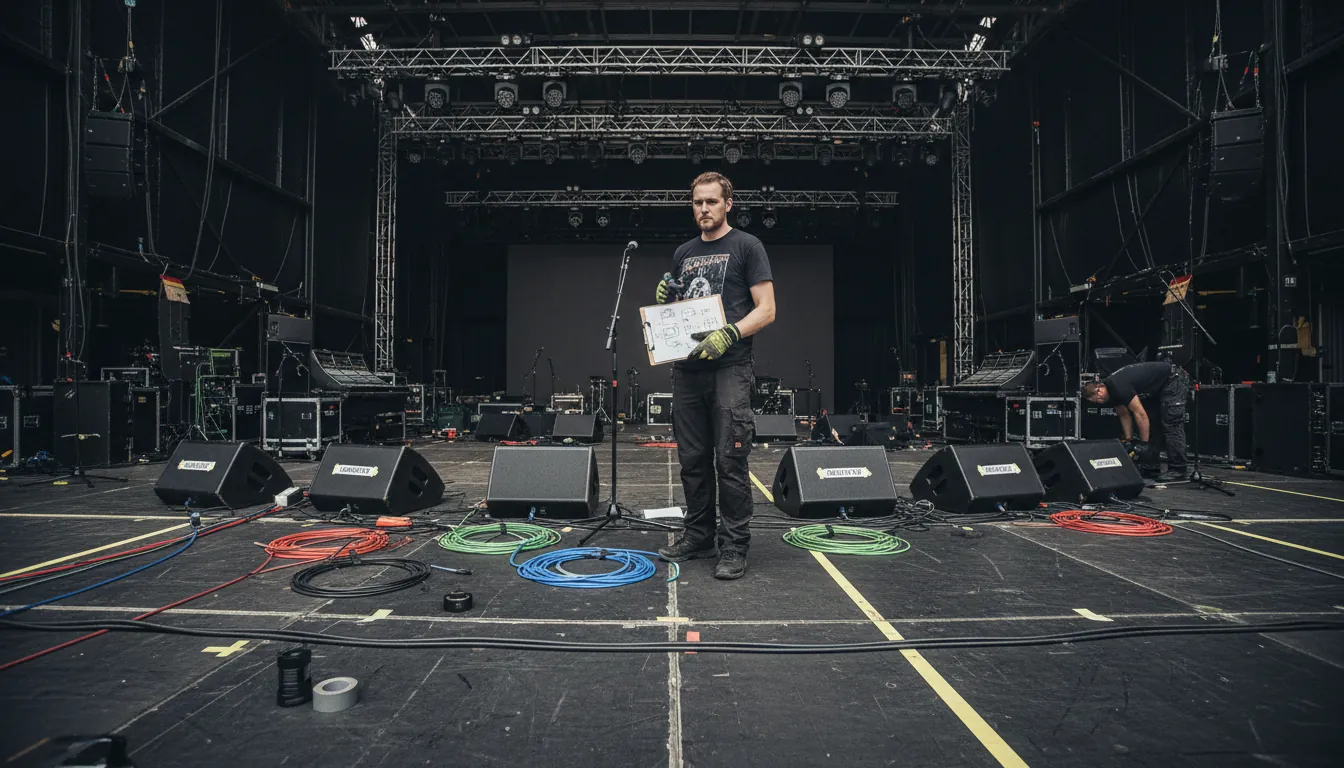
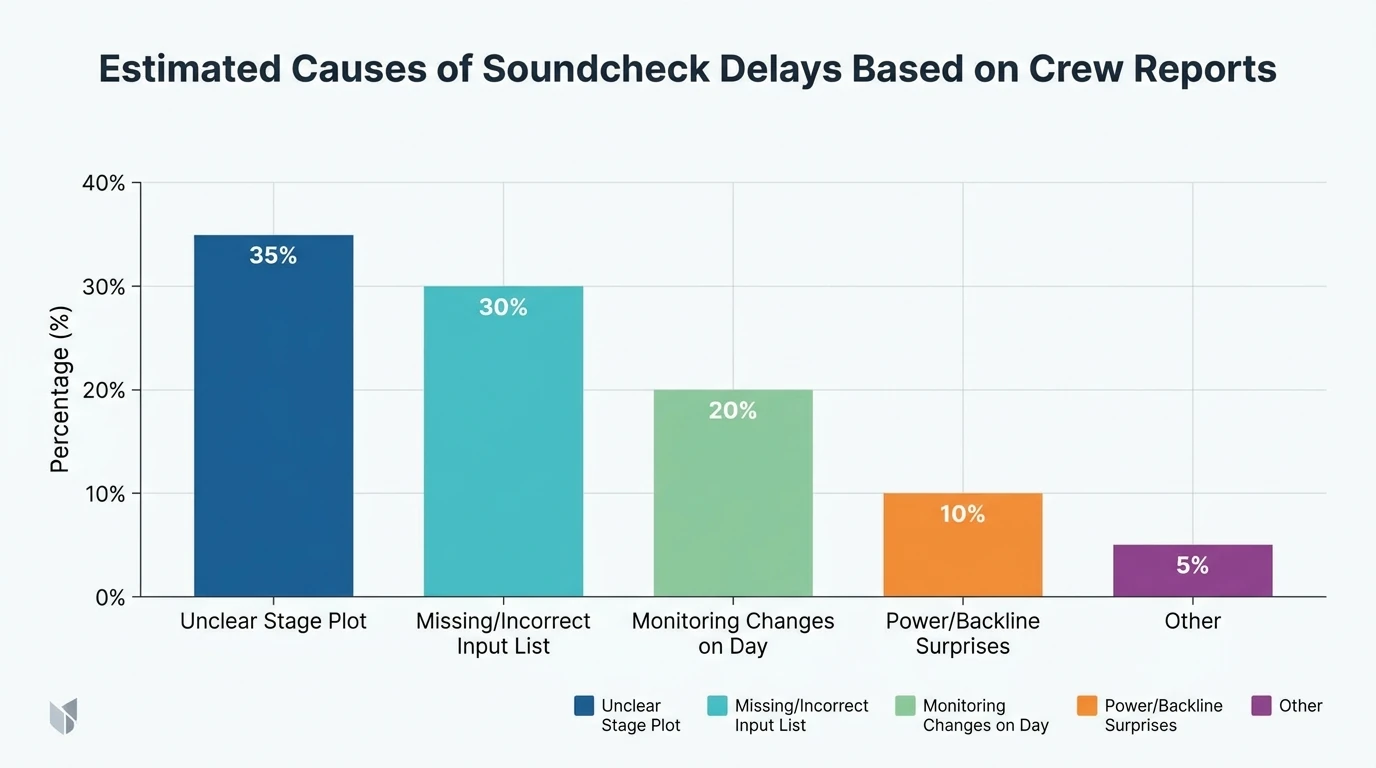
The stage is five minutes from doors, the crew is asking questions, and your guitarist is hunting for a power outlet that “should be right there.” I’ve been on both sides of that moment (artist and production), and the fastest way to calm the room is professional stage plot design: a clear, updated map of who stands where, what plugs in where, and what the crew must set first. Done well, it shortens load-in, reduces patching mistakes, and helps FOH/monitor engineers mix confidently from song one. This guide gives you a practical professional stage plot design checklist you can reuse for every live show.
What “professional stage plot design” actually includes (and what it’s not)
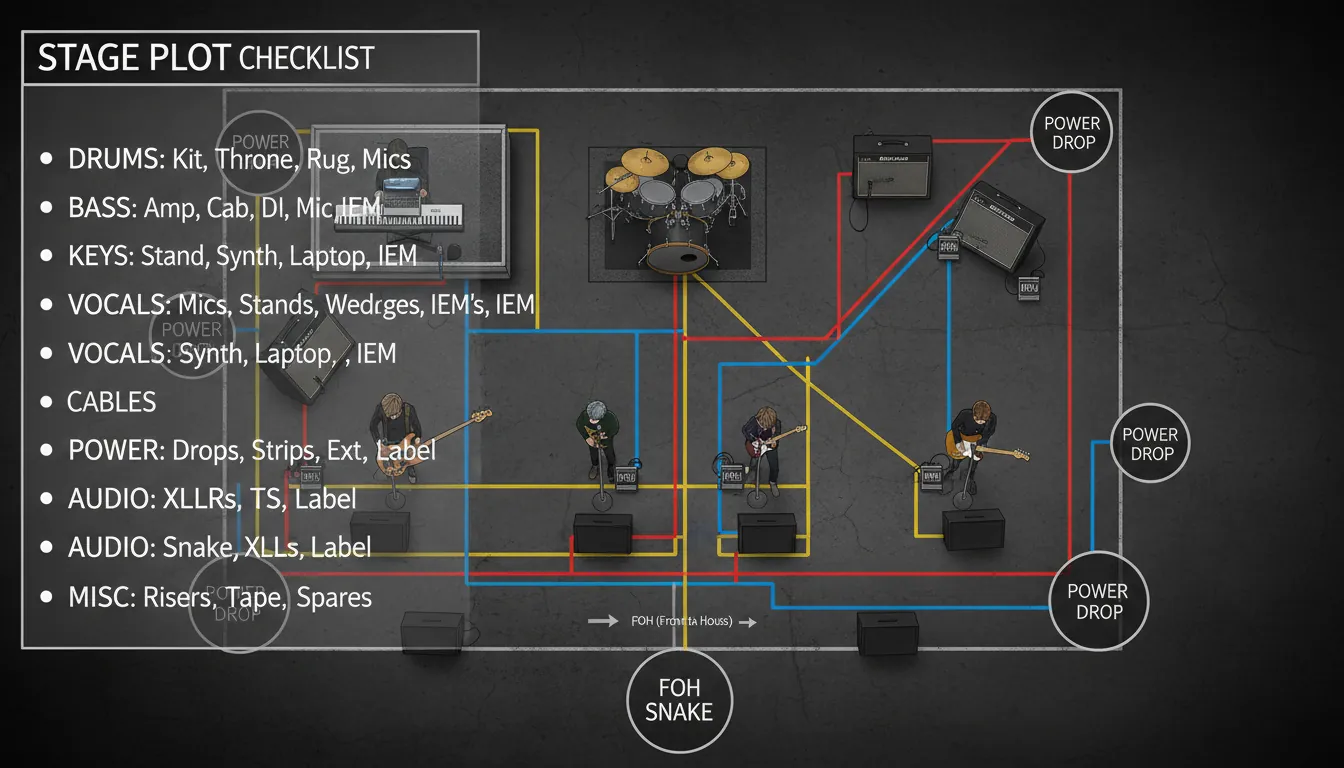
A stage plot is a visual layout of the stage from the audience perspective (downstage at the bottom, upstage at the top). A professional one labels positions, microphones, monitors/IEMs, backline, power needs, and any special notes that affect setup and safety. It is not a vibe board, and it’s not a substitute for an input list—think of it as the map, while the input list is the wiring schedule.
In my experience, the biggest failure mode is sending a pretty diagram that doesn’t match reality. If your plot says “keys stereo DI,” but you show up with a mono amp, the crew loses time and trust. Your goal is boring clarity: accurate, readable, and current.
- Stage plot = where things go
- Input list/channel list = what gets plugged in and in what order
- Tech rider = what you need from the venue + policies + constraints
Authoritative deep-dives worth bookmarking:
- StagePlot Guru’s stage plot design overview
- NLFX Pro guide to stage plots and input lists
- Off Trail Studios guide to tech riders, advancing, and file organization
The professional stage plot design checklist (use this every time)
1) Document header: make it easy to identify the right file
A plot that can’t be matched to the correct band or version is worse than none. Put the basics in the header so a stage manager can confirm it at a glance.
Include:
- Artist/band name + show name (if relevant)
- Primary contact and backup contact (role, phone, email)
- Version number + last updated date
- Set length (helpful for festivals and changeovers)
Practical tip I use: name the PDF like ARTISTNAME_StagePlot_v3_2026-04-22.pdf so older versions don’t float around production inboxes.
2) Stage orientation and scale: prevent left/right confusion
Your plot should be drawn from the audience perspective. Label:
- Downstage (front), upstage (back)
- Stage left/right
- Any fixed venue constraints (pillars, stairs, LED wall, drum riser, thrust)
If you know the venue dimensions, draw roughly to scale. If not, keep proportions reasonable and include notes like “minimum 24' wide” or “tight stage—keys can go SL or SR.”
3) Band member positions + names (not just instruments)
Crews mix people, not just gear. Label each position with:
- Name (or role) + instrument(s)
- Vocal yes/no (and mic type if special)
This is one of the simplest “pro” signals to a venue team, and it reduces mispatches during line check.
4) Backline and instrument placement: amps, stands, risers
Mark:
- Drum kit location (and riser height if required)
- Guitar/bass amps and cab directions (aim matters)
- Keyboard stands, laptop tables, DJ booth
- Pedalboards and “must be reachable” zones
If you’re sharing backline at a festival, add a note like “uses house kit; bring snare + cymbals.”
5) Microphone and DI locations: be specific where it matters
For each source, indicate:
- Mic position (vocal mic stands, amp mic, horn mic, etc.)
- DI boxes needed (keys stereo, acoustic DI, tracks, bass DI)
- Whether you bring the mic/DI or need venue supply
- Stand type if non-standard (tall boom vs short boom)
If you have non-negotiables (e.g., you bring your own vocal mic), label it clearly.
6) Monitoring: wedges, IEMs, sidefills, drum fill
This is where shows often go sideways. Your plot should show:
- Wedge locations with mix numbers (Mix 1, Mix 2…)
- IEM users (wired/wireless), packs, antenna placement if you carry it
- Talkback mic needs (especially with tracks/click)
- Any “no wedge” policies to reduce open mics and feedback
I’ve found that simply writing “Lead vox: IEM stereo, needs click” saves 10 minutes of questions at soundcheck.
7) Power drops and cable paths (and how to keep people safe)
Power planning prevents ugly cable runs across performance zones. Mark:
- Where you need AC drops (keys world, pedalboards, playback rack)
- Voltage/region notes if touring internationally
- “No cables across downstage edge” preferences
Safety best practices (especially for lighting/video power near foot traffic):
- Keep power separated from signal where possible and cross at 90° when needed
- Use ramps/mats on walkways; avoid egress paths
These align with common safety guidance in stage lighting practice, such as secondary safeties on flown fixtures and careful cable routing (A.C. Entertainment Technologies on lighting safety fundamentals).
8) Special notes: the small details that save the show
Add a short “Notes” box for items like:
- Playback: “Ableton → interface → 2x XLR L/R + click to drummer”
- Props, wireless counts, guitar changes, instrument swaps
- Lighting cues requests (simple is fine), haze yes/no
- Quiet set requirements, hard start, walk-on music
Keep this section brief. The more text you add, the less people read.
Pair it with an input list (the pro move crews expect)
A stage plot without an input list forces the engineer to guess your channel needs. Standard practice is to order inputs in a familiar patch flow (often drums → bass → guitars → keys → tracks → vocals). If you’re an opener and channels may be cut, put essential sources first.
Here’s a compact example table you can adapt.
If you want to go deeper, build a “festival patch” version with stagebox numbers and alternates, but keep your standard version clean and readable.
Common stage plot mistakes (and how to fix them fast)
- No audience perspective: Left/right gets flipped. Fix: label stage left/right and “audience view” clearly.
- Unlabeled wedges: Monitor world can’t pre-plan mixes. Fix: number mixes and assign each to a performer.
- Missing power: Keys and playback end up with extension cords across downstage. Fix: add power drops and keep cable paths logical.
- Outdated versions: The crew sets up last month’s lineup. Fix: version + date in header and filename.
- Cluttered icons: Too dense to read in low light. Fix: simplify symbols, add a small legend if needed.
Stage plot design that also improves your visuals (online and on-stage)
Your live layout isn’t just logistics—it shapes what the audience sees and what cameras can capture. When I started planning stage plots with “camera lanes” in mind (clear sightlines to lead vocal, drummer visibility, space for a roaming cam), our show content improved immediately.
This is where Freebeat AI can help after the gig: if you’re capturing live audio or a board mix, Freebeat AI can generate audio-reactive performance visuals and story-aware edits that follow BPM, drops, and sections—great for recap clips, tour announcements, and stage visual concepts. If you’re exploring performance visuals, you may also want to review:
- AI music video generator (Freebeat AI main platform)
- Lyric video generator (karaoke-style timing and dynamic lyrics)
- Dance video generator (rhythm-locked edits for choreography/performance content)
How to Create Input Lists and Stage Plots for Live Sound
A simple workflow you can repeat for every show (advancing-friendly)
- Build your base plot (your ideal setup).
- Create/refresh your input list (match it to the plot).
- Export to one PDF (or a linked package) with version/date.
- Advance early: send to the venue/PM with questions like:
- House console + monitor capability?
- Wedges/IEM support and available mixes?
- Stage dimensions and power availability?
- Print one copy for stage + keep one offline on your phone.
This “advance once, panic never” approach is consistent with touring best practices: clarity, early sharing, and realistic requirements.
Conclusion: make your next load-in feel unfairly easy
A good professional stage plot design is the quiet hero of live production: it protects your time, your soundcheck, and your reputation with crews who have seen everything. I’ve watched a clean plot turn a stressful changeover into a smooth, almost boring setup—and “boring” is exactly what you want before a high-energy show. Update your plot today, pair it with an input list, and send it early so the venue can say “yep, we’ve got you.”
📌 animate your ideas plotagon freebeat
FAQ: Professional stage plot design
1) What should be included in a professional stage plot design?
Band positions (with names), backline placement, mic/DI locations, monitor mixes (wedges/IEM), power drops, stage orientation, and a version date—plus brief special notes.
2) Should my stage plot include an input list?
Yes. Many teams expect both. You can attach a separate input list page or include a simplified channel list, but it must match the plot.
3) How do I label stage left and stage right correctly?
Use the audience perspective: stage left is the performer’s left (audience right). Mark “audience view” to prevent confusion.
4) How detailed should monitor mix notes be?
Enough to be actionable: Mix number + who it’s for + key priorities (e.g., “Lead vox: vocal loud, less guitar, add verb”). Avoid essays.
5) What file format should I send to venues?
PDF is safest. Include version/date in the filename and header so older copies don’t get used.
6) How far in advance should I send a stage plot?
As soon as the show is confirmed or when advancing starts—ideally at least a week out for clubs, earlier for festivals or tours.
7) How do I adapt a stage plot for small stages or support slots?
Create a “minimum footprint” version: fewer wedges, reduced drum mics, mono keys/tracks option, and backup positions (keys SL/SR) to fit tight stages.


