Edit Photo in Canva: Features, Limits, and Best Uses
You’ve got a photo that’s almost right—good lighting, decent framing, but the background is messy, colors feel flat, or the crop doesn’t fit Instagram. If you’ve ever opened Canva thinking, “I just need a quick fix,” you’re in the right place. This guide explains how to edit photo Canva style (fast, clean, and repeatable), where the “Edit photo” button lives, what Canva can and can’t do, and when you should switch tools. I’ll also show how creators often pair Canva photo edits with music-driven video workflows (especially if you’re turning visuals into short-form content).
What “Edit Photo” in Canva Actually Means (and Why It’s Popular)
When people say edit photo Canva, they usually mean quick, non-destructive edits inside a browser or mobile app—without the learning curve of pro editors. Canva’s photo editor combines basics (crop, rotate, exposure) with AI tools (background remover, Magic Eraser, generative fill/expand in some plans). The big advantage is speed: you can edit and immediately place the image into a thumbnail, poster, ad, or Reel cover without exporting/importing between apps.
From my own workflow, Canva shines when the end goal is a design asset, not a “perfect retouch.” I’ve used it to clean up headshots for speaker slides, normalize product photo brightness for landing pages, and prep consistent creator thumbnails in batches. The edits may be lighter than Photoshop, but the time saved is often the real win.
How Do I Edit a Picture in Canva? (Step-by-Step)
You can edit photos in Canva two main ways: in the standalone Photo Editor or inside a design canvas. Either way, the steps feel similar.
1) Start in the right place
- Go to Canva and open Photo Editor (or open any design size you need).
- Upload your image (common formats include JPG and PNG; Canva also supports formats like HEIC/HEIF and WebP in many cases per its feature pages).
- Click the image to select it.
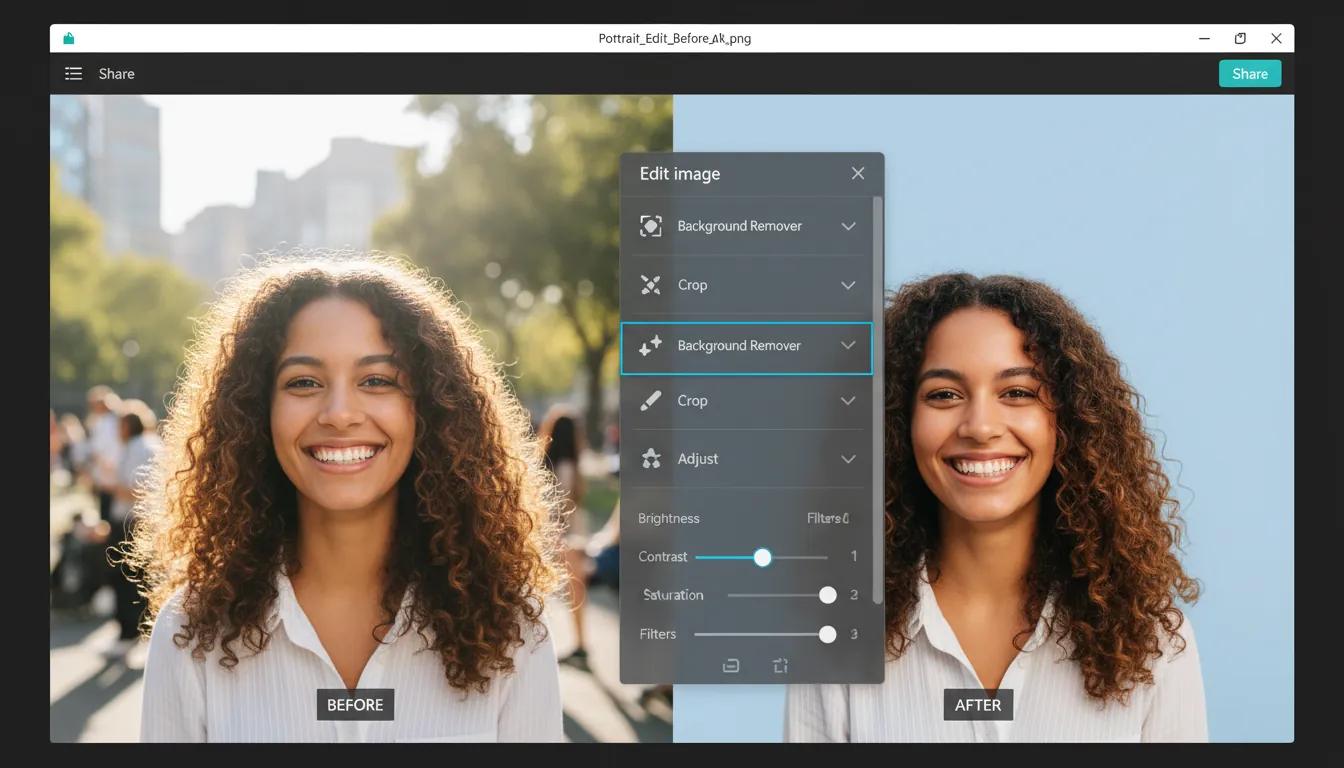
2) Where is the “Edit photo” button in Canva?
On desktop, it typically appears in the top toolbar after you select an image—labeled Edit image (many users search for “Edit photo,” but the button often reads “Edit image”). On mobile, it’s usually in the bottom toolbar after selecting the image.
3) Apply a clean, repeatable edit order
For most photos, this order prevents over-editing:
- Crop & straighten
- Light/exposure (brightness, contrast, highlights/shadows)
- Color (temperature/white balance, saturation)
- Detail (clarity/sharpness—use lightly)
- AI tools (background removal, object removal)
- Export (PNG/JPG; consider quality settings)
Canva Photo Editing Features (What You Can Do Well)
Canva covers a lot of “80/20” editing—enough for marketing, social posts, and creator assets.
Core adjustments (everyday fixes)
- Crop, rotate, flip, straighten
- Brightness, contrast, saturation, warmth/white balance
- Auto-adjust / quick enhancements (varies by mode)
These are the same types of tools beginners use to fix dull or yellow-tinted photos without getting overwhelmed.
Filters and effects (fast style changes)
- One-click filters for mood
- Blur/soft focus effects for background separation
- Simple stylization that works well for thumbnails and banners
AI-powered editing (the reason many users upgrade)
Canva has promoted an AI photo editing set that includes tools like:
- Background remover (one-click cutouts)
- Magic Eraser (remove unwanted objects)
- Magic Edit / generative tools (change or add elements in specific areas, depending on availability and plan)
- Image enhancer / upscaler options for improving perceived quality
For an overview of Canva’s AI photo features, see Canva’s AI photo editing feature page.
Canva Magic Edit & Eraser | Replace or Erase Objects In Photos!
Can You Edit Part of an Image on Canva?
Yes—within limits. You can “edit part of an image” in Canva using tools that target an area rather than the whole photo. Depending on the feature set available to your account, common approaches include:
- Select/brush-style edits in certain AI tools (area-specific changes)
- Magic Eraser to remove objects from a defined spot
- Magic Edit / generative fill-like actions to replace a region with something else
- Workaround: duplicate the photo, apply an effect to one copy, then mask/crop to reveal only the part you want
In practice, I’ve found Canva’s partial edits are excellent for simple removals and swaps (like deleting a distracting sign or extending a background), but less precise for high-end compositing where you need detailed edge control.
Can You Retouch Photos in Canva?
You can do light retouching in Canva: smoothing, brightening, removing blemish-like distractions with eraser tools, and improving overall tone. For creator headshots and brand photos, Canva’s retouch level is often “good enough” for web and social, especially when paired with good lighting.
Where Canva can struggle is precision skin work (frequency separation, advanced dodge & burn, detailed hair masking). If your job requires magazine-level retouching, you’ll want a dedicated photo editor.
Canva Photo Editing Limits (What to Watch Out For)
Even if you love the edit photo Canva workflow, it helps to know the guardrails.
1) Quality and blur problems (especially on export)
Blurry downloads usually come from:
- Starting with a low-resolution image
- Scaling a small photo too large in the design
- Export settings that compress too much
Canva’s help guidance commonly emphasizes using high-resolution images and aiming for 300 DPI for print work, plus choosing higher quality settings on export when needed. Reference: Canva Help Center: downloaded design looks blurry.
2) Color space and format confusion
For web, RGB exports (PNG/JPG) are standard. For print, PDF options can be better depending on the job. Canva also provides educational guidance on formats and resolution tradeoffs here: Canva tips on image formatting mistakes.
3) Not a full Photoshop replacement
Industry comparisons are consistent: Canva is easier, faster, and strong for template-based content—but it’s not built for pixel-perfect, high-end manipulation. A balanced comparison is covered in Style Factory’s Canva vs Photoshop review.
Canva Free vs Pro for Photo Editing (What Changes)
Many people can edit photo Canva on the free plan, but Pro often matters if you rely on AI tools and premium assets.
| Feature | Canva Free | Canva Pro (typical) | Who it’s best for |
| ---------------------------------------------------- | ---------------------- | ------------------- | --------------------------- |
| Basic adjustments (crop, brightness, contrast, etc.) | Yes | Yes | Everyone |
| Filters/effects | Many | More options | Social + branding |
| Background remover | Limited/locked (often) | Yes | Thumbnails, product cutouts |
| Magic Eraser / AI tools | Limited/locked (often) | Yes (more access) | Fast cleanup work |
| Stock library | Limited | Much larger | Marketers, creators |
| Brand Kit | Limited | Yes | Teams, consistent visuals |
| Storage | Smaller | Larger | Frequent publishers |
Pricing changes over time, but many guides place Pro around ~$15/month or ~$120/year in the US market. For additional context, see Style Factory’s Canva Pro vs Free breakdown.
Best Uses for Editing Photos in Canva (Real-World Scenarios)
Here’s where Canva photo editing tends to be the most efficient:
1) Social media content that needs speed
- YouTube thumbnails, podcast covers, profile banners
- IG carousel images and story backgrounds
- Ad creatives with text overlays and brand elements
2) Marketing and brand consistency
Canva is strong when you need to keep visuals aligned with brand identity:
- Apply the same crop ratios and color vibe across a campaign
- Add logos and typography consistently
- Build templates so edits become repeatable
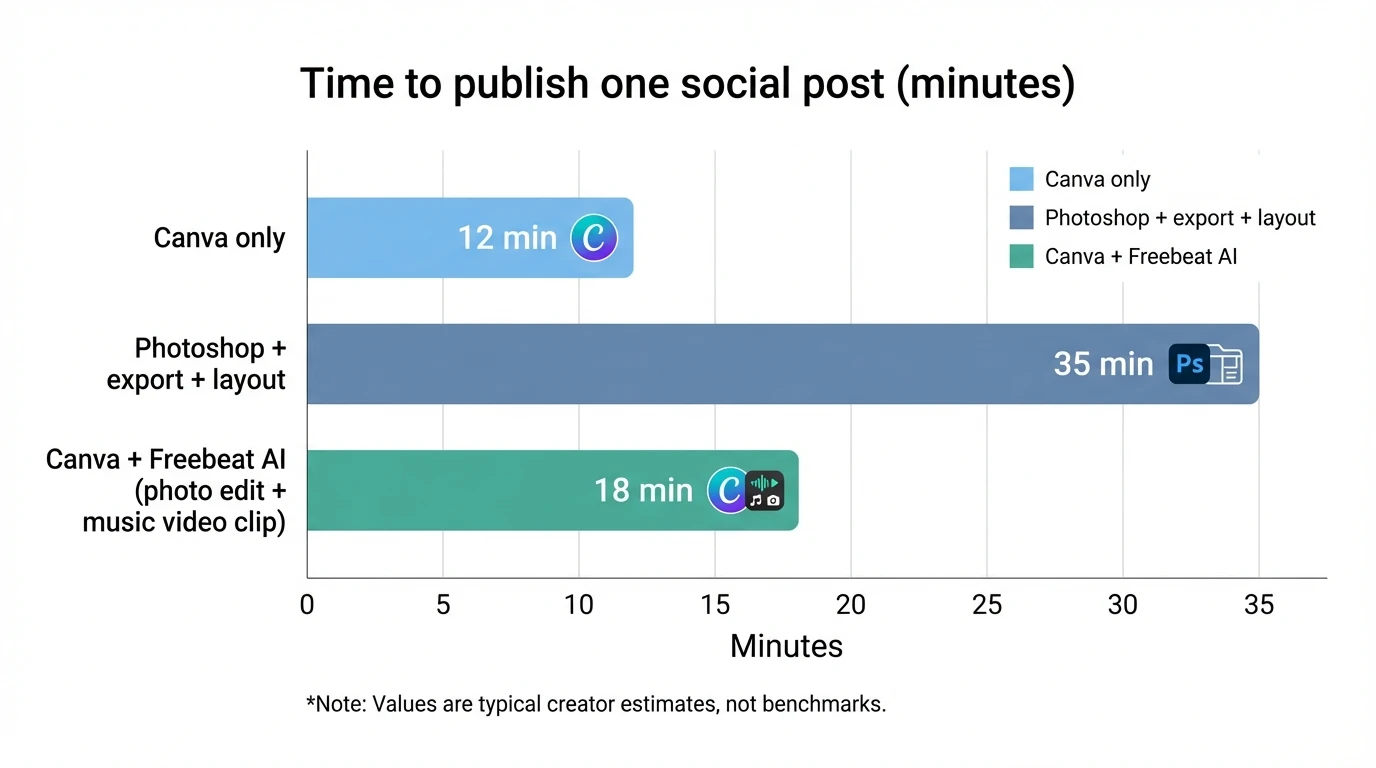
3) Creator workflows (photo → video)
A common modern pipeline is:
- Edit a strong cover image in Canva
- Turn it into motion content (Reels, Shorts, lyric clips)
- Sync visuals to audio for better retention
That last step is where Freebeat AI fits naturally. If you’re a musician or creator, you can take Canva-edited visuals (covers, character art, thumbnails, scene cards) and turn them into audio-reactive videos that follow BPM, drops, and song sections—without manually keyframing every cut. In my tests with music-first workflows, that “structure-aware” pacing is the difference between a clip that feels random and one that feels directed.
Useful next reads:
- Canva’s beginner guide for navigation and workflow shortcuts
- SmartBug’s Canva marketing best practices for campaign consistency and brand discipline
- Freebeat AI to turn your edited visuals + song into a beat-synced music video
Pro Tips: Make Canva Edits Look More “Pro” (Without Extra Tools)
- Fix exposure before filters. Filters can hide issues but rarely solve them.
- Avoid over-saturation. It looks good on one screen and harsh everywhere else.
- Export thoughtfully.
- Use PNG for crisp text/graphics
- Use JPG for photos when file size matters
- For print: start with higher-res images and confirm sizing so you don’t upscale a small photo into a poster.

When You Should Not Use Canva for Photo Editing
Canva may not be the best choice if you need:
- Advanced masking around hair/fur with manual refinement
- Complex compositing with multi-layer blending control
- Batch processing hundreds of photos with strict color accuracy
- High-end retouching for commercial beauty work
In those cases, use a dedicated photo editor—then bring the final assets into Canva for layout and publishing.
Conclusion: The Smart Way to “Edit Photo Canva” and Ship Faster
Canva is at its best when photo editing is part of a bigger deliverable—thumbnail, ad, slide, or social post—where speed and consistency matter more than microscopic precision. If you keep your workflow simple (crop → light → color → AI cleanup → export), you’ll get clean results quickly, and you’ll avoid the most common quality pitfalls. And if your goal is content that moves, pairing Canva-edited visuals with an audio-driven video tool like Freebeat AI can turn “nice pictures” into clips that feel timed, intentional, and platform-ready.
📌 behind the magic how creators use freebeat ai to go viral
FAQ: Edit Photo in Canva
1) How do I edit a picture in Canva?
Upload your image, select it, click Edit image, then use adjustments (brightness/contrast), filters, and AI tools like background removal if available.
2) Where is the edit photo button in Canva?
Select the photo first. On desktop it’s usually in the top toolbar as Edit image; on mobile it appears in the bottom toolbar after tapping the image.
3) Can you edit part of an image on Canva?
Yes—use tools like Magic Eraser or area-based AI editing where available, or use a duplicate-and-mask workaround to affect only one region.
4) Can you retouch photos in Canva?
You can do light retouching: brighten, smooth, remove small distractions, and enhance overall tone. For detailed skin or complex edits, use a dedicated editor.
5) Why does my Canva download look blurry?
Usually it’s low source resolution, scaling a small image too large, or export compression. Start with higher-res images and export at higher quality. See Canva’s blur troubleshooting.
6) Is Canva good enough instead of Photoshop?
For everyday marketing and social assets, often yes. For precision compositing and advanced retouching, Photoshop is stronger. A deeper comparison: Canva vs Photoshop.
7) Do I need Canva Pro to edit photos?
Not for basics. Pro becomes important for premium assets and AI tools like background removal and expanded “Magic” features.


