10 Low Cost Music Video Shooting Hacks That Look Pro
A low cost music video shooting day can feel like a race: you’re the artist, the producer, and sometimes the crew—while the clock (and sunlight) keeps moving. You want something that looks intentional, not “we tried our best.” The good news: “pro” usually comes from planning, lighting, and edit choices—not expensive cameras. Below are 10 field-tested hacks I’ve used (and seen work) to get a high-end look on a low budget without burning out.
1) Lock a concept that fits your budget (not your fantasies)
The fastest way to blow a low cost music video shooting plan is choosing an idea that needs permits, wardrobe changes, company moves, or VFX you can’t finish. Instead, pick one strong motif you can repeat without it getting boring—like a single prop, a signature color, or a physical action that evolves across sections of the song. DIY Musician recommends building concepts that can be shot in 4–6 hours in a single day, including setup and breakdown—this is realistic and keeps everyone fresh.
- Budget-friendly concept types that look expensive:
- Performance + micro-story (simple narrative beats between choruses)
- One-location “art space” (warehouse, studio corner, empty room with designed light)
- Reverse/action trick (simple in-camera illusion; practice is the “cost”)
External reference: DIY Musician’s low/no-budget music video tips
2) Shoot one location and “time-travel” with natural light
If you can only afford one strong location, make it work three ways: daylight, dusk, and night. I’ve done this in a single afternoon by scheduling performance coverage first (when energy is highest), then B-roll as the sun drops, then night inserts under practical lights.
Practical steps:
- Start with wide master shots while the light is clean.
- As it gets darker, switch to close-ups (noise is less noticeable).
- Use lamps, signs, or car headlights as motivated lighting at night.
This approach also reduces travel time—one of the biggest hidden costs in low cost music video shooting.
External reference: DIY Musician on making one location count
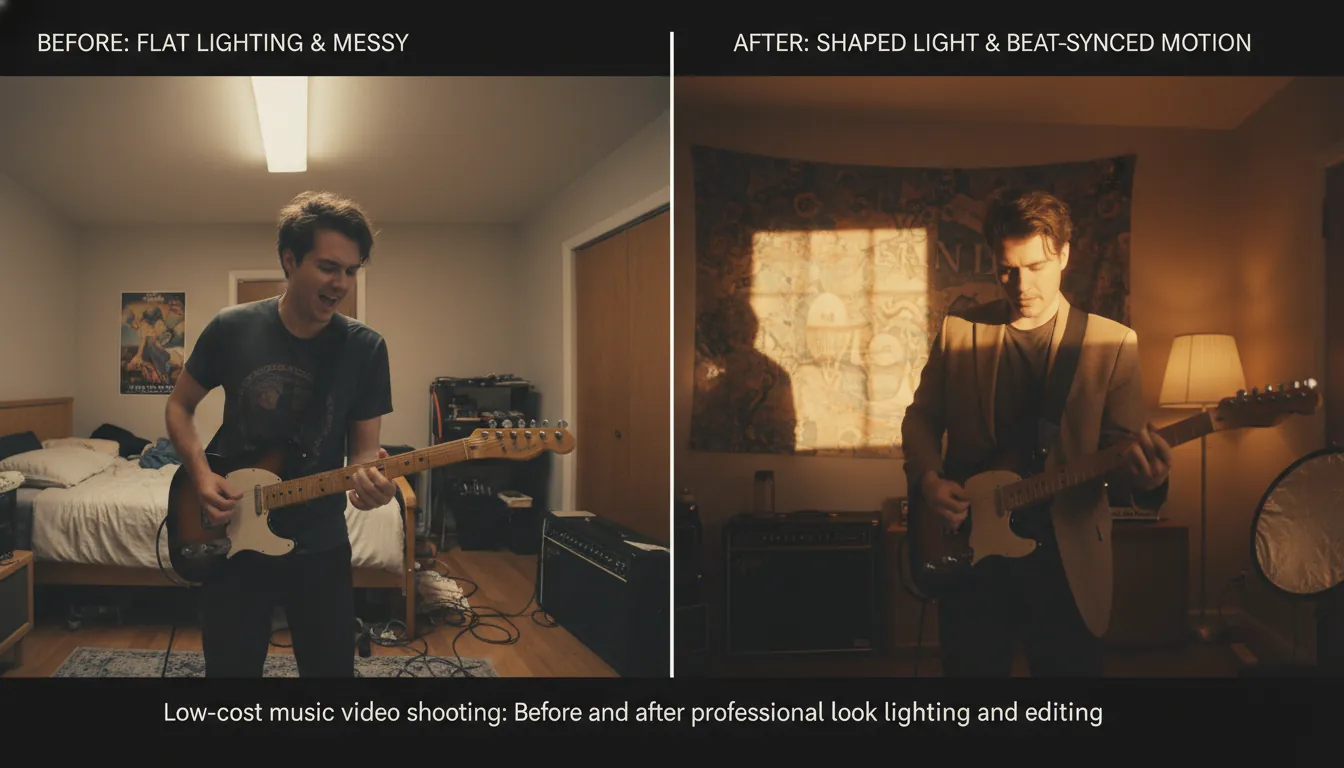
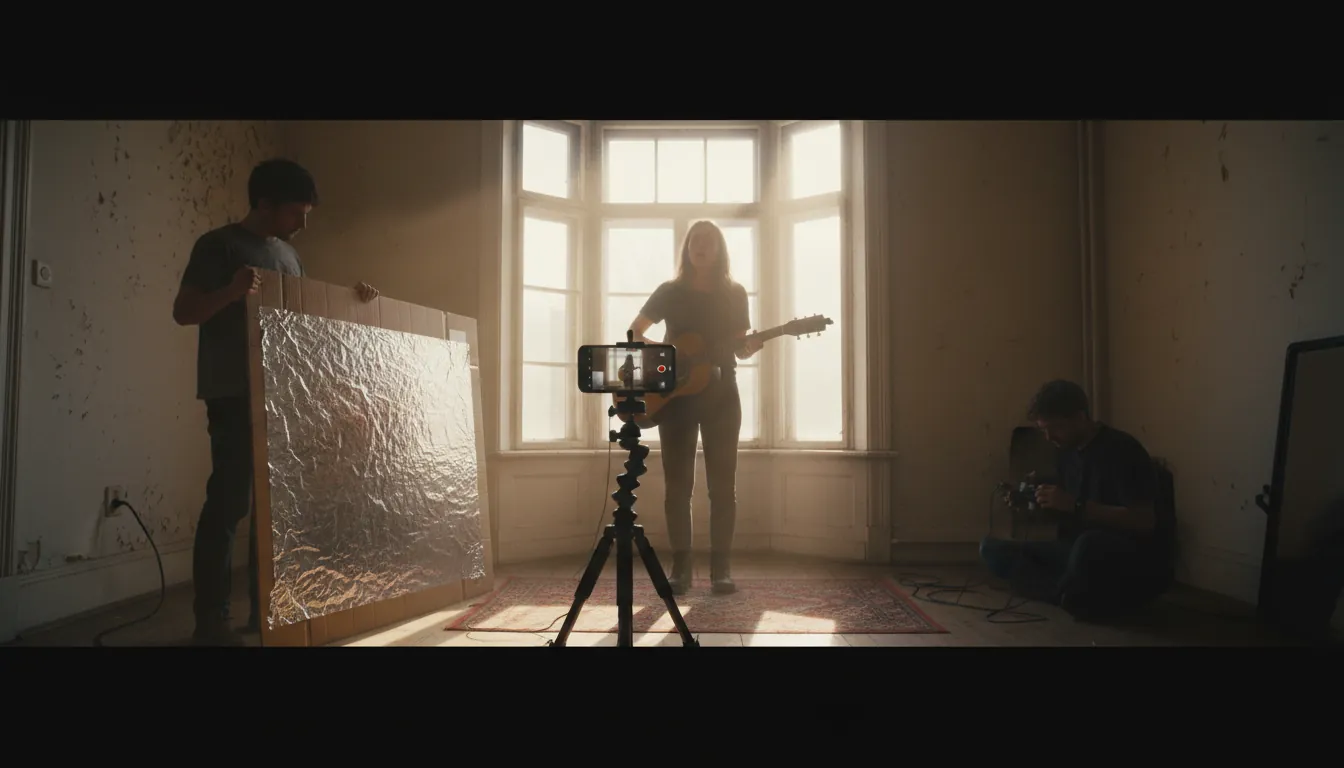
3) Use “free” production value: golden hour + shade control
Lighting is the cheapest way to look expensive. Ari Herstand’s advice is blunt and accurate: it’s more about lighting and the edit than the camera, and phones look best in good light—especially outdoors. If you’re shooting exteriors, plan around:
- Golden hour for soft, cinematic faces
- Open shade (building shadow) for even exposure
- Avoid harsh noon sun unless you’re going for a gritty look
If you’re indoors, put your subject near a large window and shape it.
External reference: Aristake: tiny budget music video guide
4) Build a reflector and bounce light like a real crew
A DIY reflector is one of the highest ROI tools in low cost music video shooting. I’ve made these in minutes on set when we forgot fill. You can bounce sunlight or a lamp back into the face to lift shadows and make skin look premium.
Quick build:
- Cardboard + aluminum foil (or white foam board for softer fill)
- Angle it until you see a clean catchlight in the eyes
This simple trick is widely recommended in DIY lighting guides because it mimics professional fill without extra fixtures.
External reference: DIY lighting hacks (foil reflector)
5) Stabilize everything (audiences read shake as “cheap”)
You don’t need a cinema rig, but you do need stability. If you’re on a phone:
- Use a tripod or clamp mount whenever possible
- For movement, use slow, controlled “human gimbal” moves (elbows tucked, heel-to-toe steps)
- Shoot wider and crop slightly in edit (if your resolution allows)
Rule I follow: either intentional motion or locked-off—nothing in-between.
6) Cheat coverage with multi-cam smartphones (and cut on beats)
One underrated low cost music video shooting method: recruit 2–3 friends with decent phones and get multiple angles at once. It instantly multiplies your edit options and makes the video feel “produced.”
Best practices:
- Sync by recording a loud clap at the start of each take
- Assign roles: wide, mid, close detail
- Have everyone match frame rate and resolution (as close as possible)
Then cut on beats, snares, and section changes—which is exactly where music videos feel most natural.
7) Make performance sync flawless (it’s more “pro” than 4K)
Viewers forgive simple visuals; they don’t forgive bad lip-sync. If you’re performing to a track:
- Play the song loud on set (speaker just out of frame)
- Do a full run once, then punch in close-ups for key lines
- Practice the delivery so consonants match (breaths too)
I’ve seen “cheap” videos become instantly credible just because the performance is tight.
8) Use simple film grammar: the 180-degree rule (and break it on purpose)
The 180-degree rule keeps screen direction consistent so your audience doesn’t feel lost. For two subjects (or artist + camera axis), imagine a line between them and keep the camera on one side of that line. In low cost music video shooting, this matters most when you intercut multiple angles quickly.
When you do break it, motivate it:
- Use a whip-pan
- Cut on a strong beat/drop
- Insert a neutral shot (straight-on) to “reset” orientation
9) Design a “look” in-camera: wardrobe + color + practical lights
A coherent palette reads as expensive. Before you rent anything, decide:
- 2–3 dominant colors (wardrobe + background)
- One accent light source (neon, LED strip, practical lamp)
- A texture element (smoke/haze if allowed, reflective fabric, water, mirrors)
If you’re indoors, practical lamps in the background add depth immediately.
10) Let AI handle the hardest part: rhythm-synced edits and pacing
Editing is where a low cost music video shooting project either levels up or looks unfinished. This is also where creators lose days trying to line cuts, camera moves, and transitions to the beat.
Freebeat AI is purpose-built for music-driven video, not generic text-to-video. It reads BPM, bars, drops, and sections, then uses that structure to drive:
- Shot planning and pacing across the whole song
- Audio-reactive transitions and camera motion
- Story-aware sequencing (performance + cinematic B-roll logic)
I tested this workflow when I had good footage but no time for a complex edit: the biggest win was getting section changes to feel intentional (especially at the drop) without manually keyframing every beat.
Recommended use cases:
- You shot performance clips but need fast, beat-locked structure
- You want lyric video timing with karaoke-style sync
- You want a consistent visual identity using custom AI avatars/characters
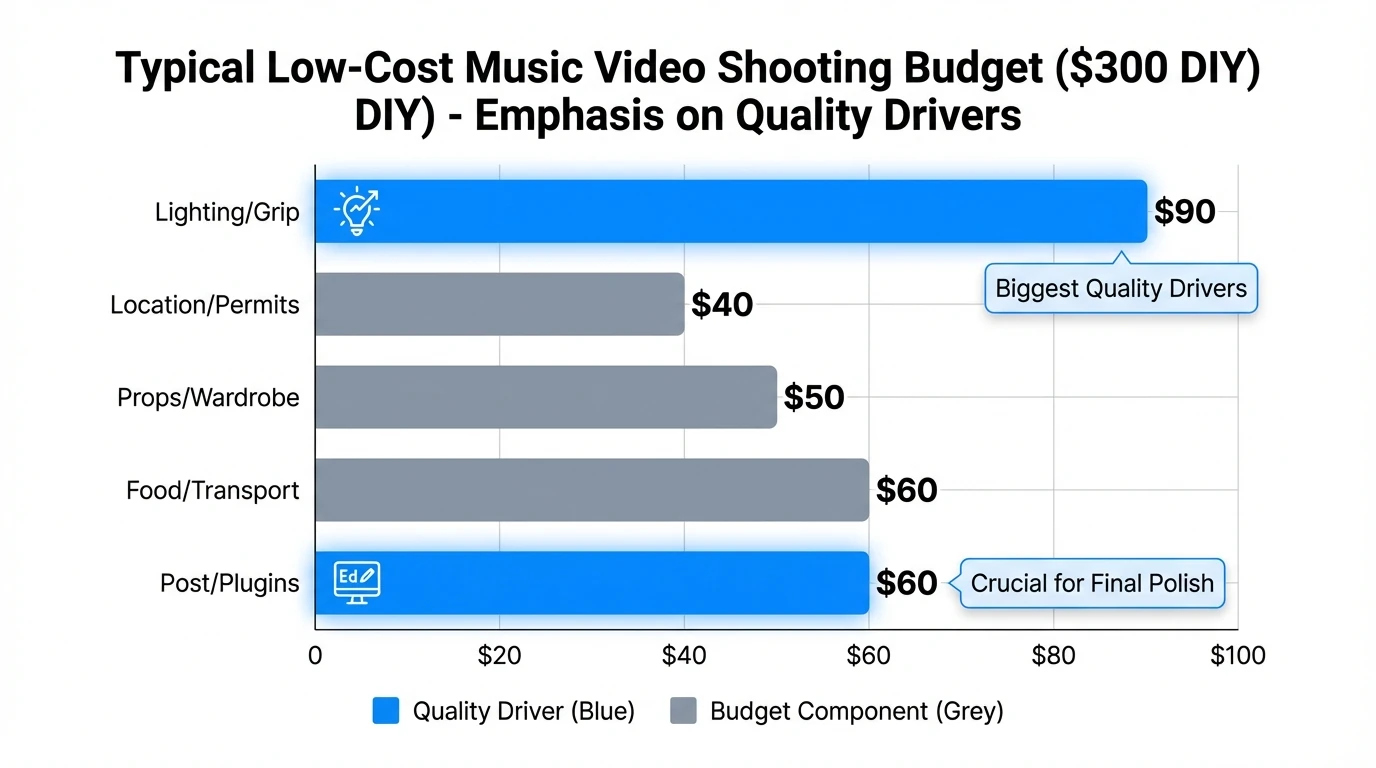
Low cost music video shooting: gear vs. outcome (what to prioritize)
The 180 Degree Rule in Film (and How to Break The Line) #180degreerule
Mini workflow: a 4–6 hour low cost music video shooting schedule
- 0:00–0:45 — Setup, block performance, test exposures (wide master).
- 0:45–2:00 — Performance takes (wide + medium).
- 2:00–3:00 — Close-ups (chorus lines, hero moments).
- 3:00–4:00 — B-roll sequence (hands, props, walking shots, textures).
- 4:00–5:00 — “Look change” (dusk/night shift; practical lights).
- 5:00–6:00 — Pickups + safety takes + thumbnails/stills for promo.
This aligns with DIY Musician’s guidance to keep the whole shoot in a single day window and minimize complexity.
Permits, “run and gun,” and staying out of trouble
It’s tempting to go full guerrilla, but the risk varies by city. StudioBinder notes that in active filming regions, shooting without permits can get you shut down, and in extreme cases equipment can be confiscated. My rule: if you’re bringing lights, stands, or blocking foot traffic, you’re no longer “invisible.”
Safer low-budget options:
- Ask for permission from small businesses during off-hours
- Use private property with a simple written okay
- Keep crew tiny and gear minimal in public areas
External reference: StudioBinder on location scouting and run-and-gun realities
FAQ (People Also Ask)
1) How to shoot a music video with a low budget?
Keep it simple: one location, one strong visual motif, natural light, and tight performance coverage. Use a phone + tripod, add a DIY reflector, and cut on beats. Plan to finish in one day so you don’t bleed money on food, travel, and reshoots.
2) How much does it cost to make a low budget music video?
A true DIY can be $0–$500 (friends, phone, free locations). A “micro-budget but polished” shoot often lands $500–$3,000 once you add lights, props, and paid help for a day.
3) How much does a 2 minute music video cost?
If you keep it one location and self-edit, 2 minutes can cost about the same as 3–4 minutes—most cost is in the shoot day and post time, not duration. Budget ranges are similar: $0–$500 DIY, $500–$3,000 micro, higher if you add crew/locations.
4) What are some low budget music videos that are great?
Many iconic videos rely on a clear concept and strong direction rather than expensive production. Examples often cited include “Subterranean Homesick Blues,” “Oxford Comma,” and “Cornerstone” for their simple, memorable execution.
5) What is the 180 rule in videography?
It’s a continuity rule that keeps left/right screen direction consistent. Imagine a line between subjects and keep cameras on one side so your cuts don’t flip orientation and confuse viewers.
6) How much does YouTube pay per 1000 views for music videos?
It varies widely by country, ad type, viewer behavior, and rights/claims. RPM can range from well under $1 to several dollars per 1,000 views, but music content often faces additional monetization complexity due to rights management.
Conclusion: make your budget feel like a style choice
Low cost music video shooting isn’t about pretending you had a huge budget—it’s about making smart constraints look like direction. When you commit to one location, shape light with simple tools, prioritize performance sync, and edit to the song’s structure, viewers feel “pro” even on a phone. If you want the rhythm, pacing, and transitions to lock in fast, Freebeat AI can handle the music-driven planning so your visuals land with the energy of the track.