
freebeat Agent Tutorial for Music Videos
If freebeat Agent caught your attention, it is probably because it promises something rare: the ability to take a single track and drive it all the way toward a finished music video with real speed, structure, and creative force. This guide is not just here to explain which button does what. It is here to show you how to move through the workflow like someone building a piece that should actually land. From the first setup decisions to the final merge, each stage gives you a different kind of leverage over the result. Follow it in order, and you can feel the project stop being a loose idea and start taking on the shape, momentum, and presence of a real MV.
1Start in the Agent Workspace
Start by locking the lane, the track, the prompt direction, and the session controls before you create anything. In freebeat Agent, these are not cosmetic inputs. They are the opening production decisions, and the rest of the system will build on them immediately.
If you are new to the product, this is where you stop thinking like someone testing a tool and start thinking like someone setting a production in motion. A careful setup here does more than prevent rework. It gives the whole run authority.
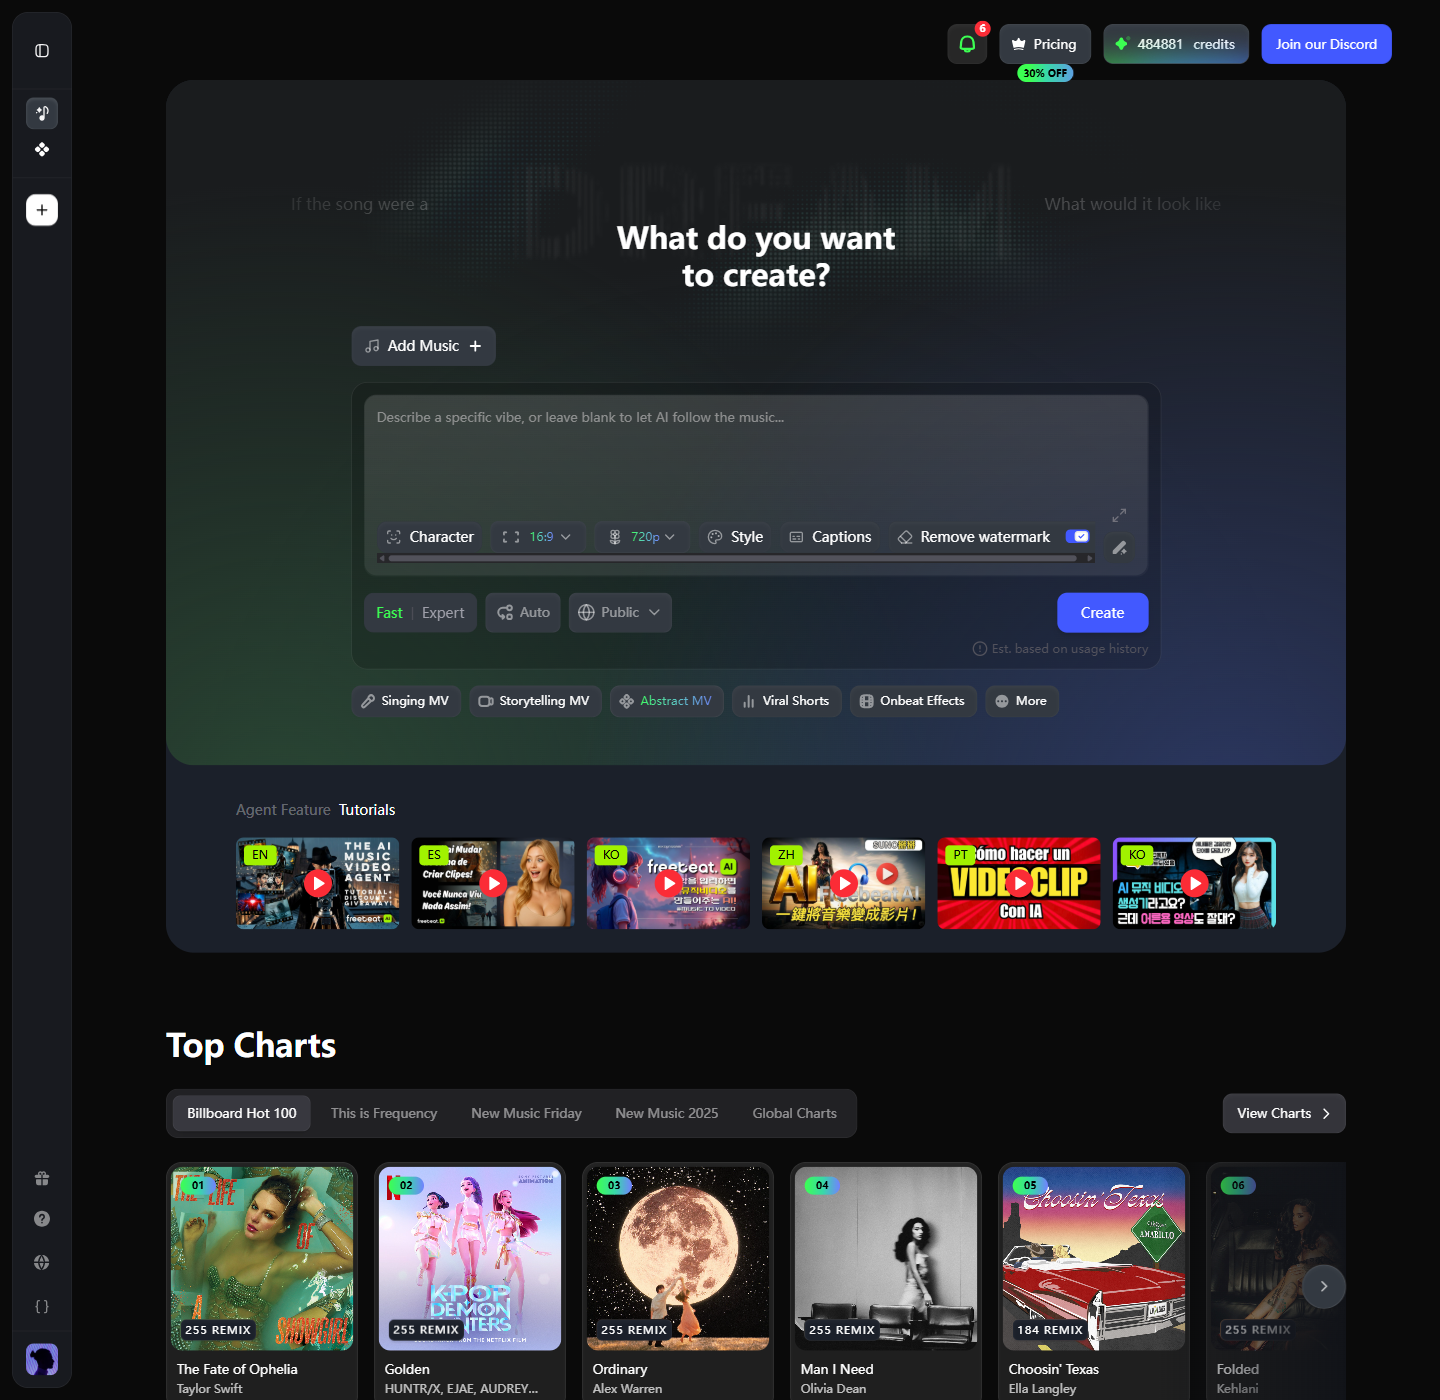
1.1Open the Agent entry and stay on the main MV path
Open /music-video-generator and begin from the main Agent entry for your first serious run. This is freebeat's flagship MV path: the broadest, strongest, and most complete route from first setup to final merge. If you want to understand what the product can really do, this is the lane that shows its full range.
Under the main creation box, freebeat also offers specialist modes such as Singing MV, Storytelling MV, Abstract MV, Viral Short, OnBeat Effect, and More. Those modes are useful when the brief is already narrow and the outcome is more constrained. But if you want the full experience of turning one track into a complete visual piece, stay on the main path first.
Use the mode labels like this:
Singing MV: choose this when the performer should remain the center of gravity throughout the video. It is best for artist-forward pieces where lip-sync presence, expression, stage energy, and recurring focus on the singer matter more than large-scale world-building.Storytelling MV: choose this when the song needs a clearer narrative arc. This mode is better when the video should feel like it is progressing through setup, development, contrast, and payoff instead of living purely on visual mood.Abstract MV: choose this when texture, atmosphere, rhythm, and visual emotion matter more than literal story. It is the right lane when you want the result to feel stylized, immersive, and art-led rather than scene-by-scene narrative.Viral Short: choose this when the output needs to land fast and read instantly on short-form platforms. It is designed for compact, high-impact videos where the hook has to arrive early and the pace needs to stay tight.OnBeat Effect: choose this when beat reaction, timing punch, and motion impact are the priority. It is best for rhythm-driven output where sync and kinetic response matter more than building a full MV world.More: open this when you already know the main flagship path is broader than the task. It leads to additional tools and narrower creative lanes for more specialized jobs.
For a first project, do not switch lanes just because a specialist label sounds exciting. Run the full Agent workflow once and let it carry a song all the way through concept, structure, images, clips, and merge. That first full run is where the product stops feeling like a set of features and starts feeling like a real creative system.
Recommendedlock the lane first, then build the concept and assets around it.
Not recommendedchanging modes after the concept is already taking shape and expecting the same setup to remain coherent.
1.2Add the track you actually want to build around
Click Add Music and attach the exact track you want this MV to follow. If you are exploring, start with the built-in library. If you already have the final audio, use Upload music. If you use a URL, make sure it points to the exact version you intend to build around.
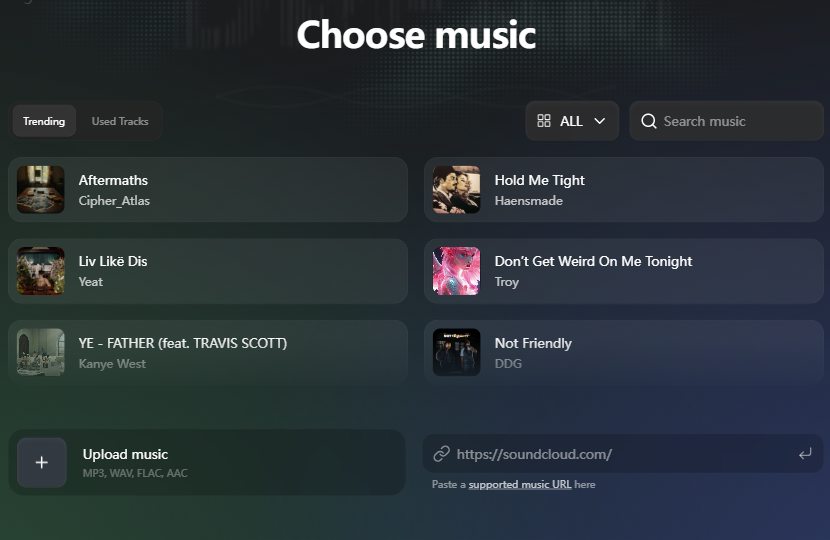
- Use the library when you want to compare directions quickly.
- Use
Upload musicwhen you already have the definitive file. - Use a URL only when you trust the source and know it is the correct cut.
Do not treat this as a placeholder step. freebeat reads the track as structure, pacing, phrasing, and energy, not as background decoration. Replacing the song later is not a small swap. It changes the logic under every stage that follows. Once the track is attached, play it back once and confirm it before moving on. The more solid the musical foundation is here, the more the entire MV can build with clarity, timing, and conviction instead of feeling loosely assembled.
1.3Give Agent a usable starting direction
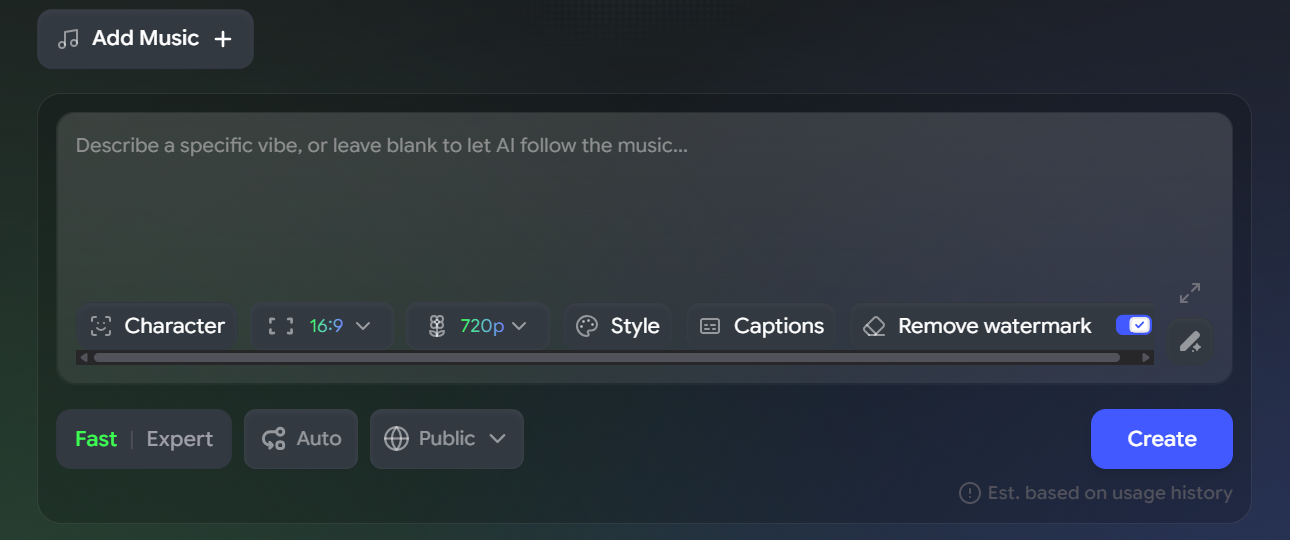
Click into the main text box and give Agent a starting direction it can actually build from. You can write the MV idea directly, or leave the field blank and let AI follow the music more freely. If you do write a prompt, keep it clear enough to guide the system and simple enough to stay structurally strong through the workflow.
The fastest way to write a strong first prompt is to answer four practical questions:
- Who or what should the audience stay focused on?
- What world or setting should the MV belong to?
- What visual mood should carry the piece?
- How should the energy evolve when the track opens up?
This is not where you try to sound poetic. It is where you establish the first real creative command the rest of the workflow can build on. A concise line such as "silver-suited driver in a neon rain city, glossy close-ups, restrained opening, stronger forward motion when the beat opens up" gives the system something it can actually interpret, preserve, and carry forward. The stronger the direction is here, the more the later stages can feel like expansion instead of recovery.
1.4Review the creation controls before you lock the session
Before you click Create, review the control row beneath the prompt and set only what this run actually needs. This is where you define the session envelope: subject setup, output format, quality level, and the behavior choices that determine what kind of run you are about to launch.
Use the controls deliberately:
Character: turn to this when you need to seed a specific lead subject before planning starts.- Aspect ratio such as
16:9: choose the destination first, then match the frame to it. - Resolution such as
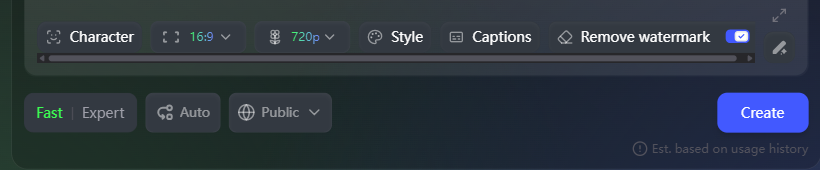
720p: set the output level you actually want for this session. Style: use it when you want to bias the visual lane before analysis begins.CaptionsandRemove watermark: useCaptionsas your subtitle selection, and decide here whether watermark removal matters for this run.FastorExpert:Fastis the quick mode when you want speed, whileExpertis the expert mode for a more deliberate pass.AutoandPublic:Automeans the session runs in fully automatic mode, whilePubliccontrols whether the run is visible to others.
This row matters because delivery choices become production constraints the moment the run starts. If this is a quick directional pass, optimize for speed. If this is the first serious version, set the session the way you would want to keep it. This is one of the first places where freebeat stops feeling like prompt input and starts feeling like production control with consequences.
1.5Create the session
Click Create, read the confirmation modal, and stop if anything locked there is still wrong. Once you continue, key settings such as aspect ratio and resolution are fixed for the run.
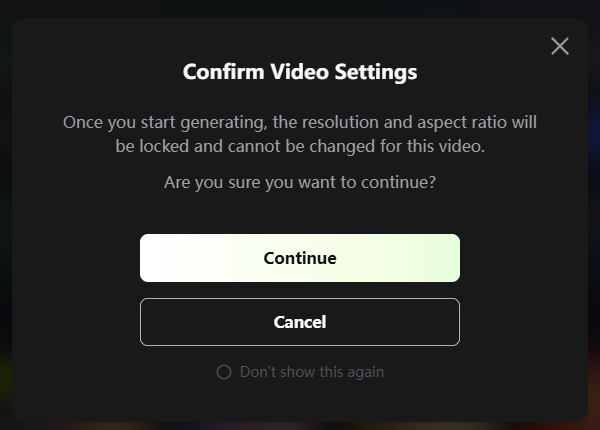
Treat this modal like a preflight check. If the setup still feels off, back out and correct it now. If everything is right, click Continue and let freebeat move from preparation into execution. This is the handoff point where setup stops being hypothetical and the session starts becoming a real run.
Recommendeduse this modal as a final preflight check before the workflow locks in.
Not recommendedrushing through confirmation and only later discovering the frame shape or resolution was mis-set from the very beginning.
2Follow the Agent Workflow
Once the session is live, the work changes character. You are no longer preparing a run. You are now shaping the MV layer by layer.
This is where freebeat Agent starts to feel genuinely high-leverage. Each stage owns a different part of the final piece: intent, music logic, visual language, concept, references, structure, frames, motion, and final merge. Review them in order, and you are not just checking progress. You are building a project that gains coherence, force, and presence at every step.
2.1Plan
Start in Plan and read the route before you judge output. This is the opening systems view of the session, and it shows you the full path freebeat is about to execute before the workflow starts turning those decisions into media.
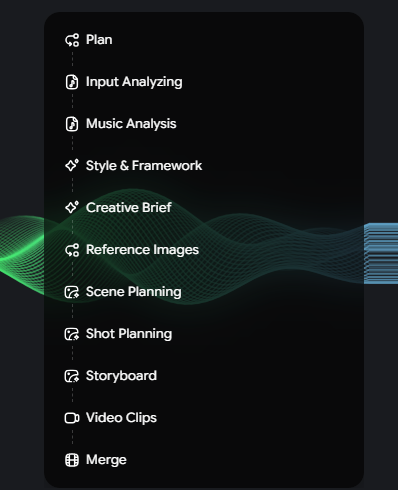
This is your first opportunity to understand the run at a glance. You are not looking at final results yet, and that is exactly why the stage is valuable. Large workflow misunderstandings are cheapest to catch before the heavier steps begin. Strong work often starts with this exact feeling: the system is not guessing in the dark, and neither are you. You can already see the shape of the project before the most expensive parts of the workflow even begin.
At the top of the workspace, you will also see the three views that stay with you through the project:
Results: the clearest approval view for each workflow stage.Editor: the timeline view once images and clips exist.Canvas: the canvas view for reviewing the project in a spatial layout.

For a first project, stay in Results until the workflow reaches media generation. It is the cleanest view for stage-by-stage approval and the easiest place to catch drift before it spreads. The clearer this early read is, the more confidently you can let the rest of the workflow build.
2.2Input Analyzing
Read Input Analyzing before you trust the run. This is the moment where freebeat shows you how it has translated your words into production logic. If the interpretation is strong here, the rest of the workflow can build with confidence. If it is weak here, later stages will only make the miss more expensive.
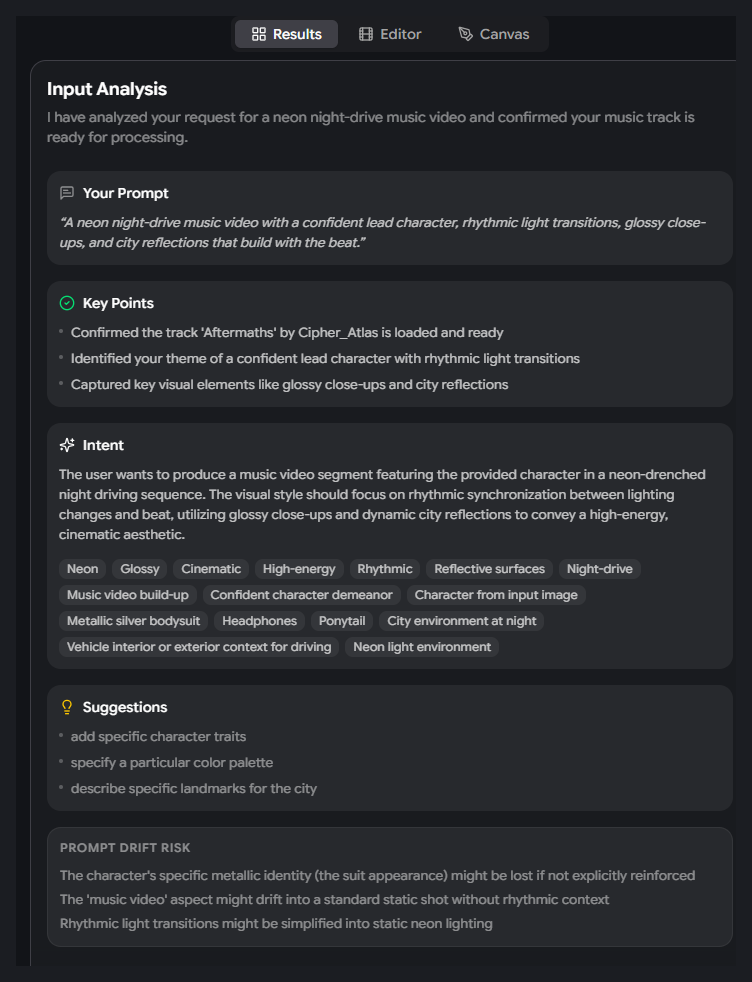
Check the panel in order:
Your Prompt: the exact starting direction the Agent is using.Key Points: the ideas the system believes must survive the workflow.Intent: the operational creative target the Agent has derived from your input.Suggestions: ways to tighten the direction if needed.Prompt Drift Risk: what may be lost unless it is reinforced.
If the core subject, tone, or world already feels wrong here, stop and correct it. This is one of the highest-leverage checkpoints in the entire workflow, because it sits right between open language and structured execution. When this stage lands, you are no longer hoping the system understood you. You know what it is building toward.
2.3Music Analysis
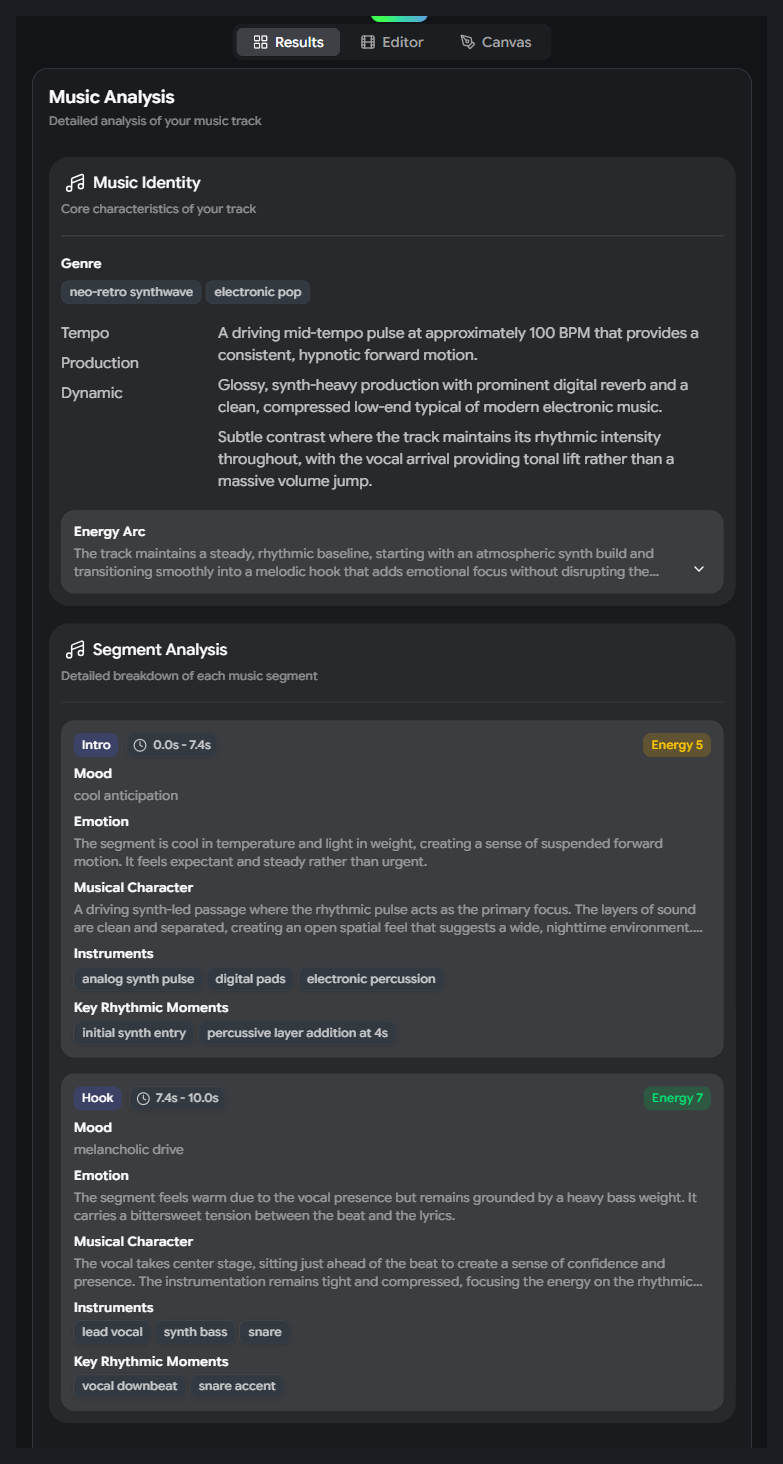
Read Music Analysis before you approve any visual planning. This is where the workflow decides whether the MV will be built on the actual movement of the track or just decorated around it.
Review three layers:
- The overall musical identity: genre feel, production texture, dynamic range, and tempo character.
- The
Energy Arc: whether the rises, releases, and momentum shifts feel true to the track. Segment Analysis: whether the split points match the actual movement of the song.
This stage is where freebeat starts feeling less like a generic generator and more like a serious music-video workflow. The track is not being treated as background. It is being used as structure. When the read is strong, later scene, storyboard, and clip decisions start feeling musically earned instead of visually arbitrary. That is one of the clearest signs the project is building real momentum.
2.4Style & Framework
Approve the visual lane here, or change it here. This is where you decide what kind of MV the workflow is actually becoming before images and clips make that direction expensive to undo. More than almost any other stage, this is where the project starts taking on a visual identity people can actually feel.
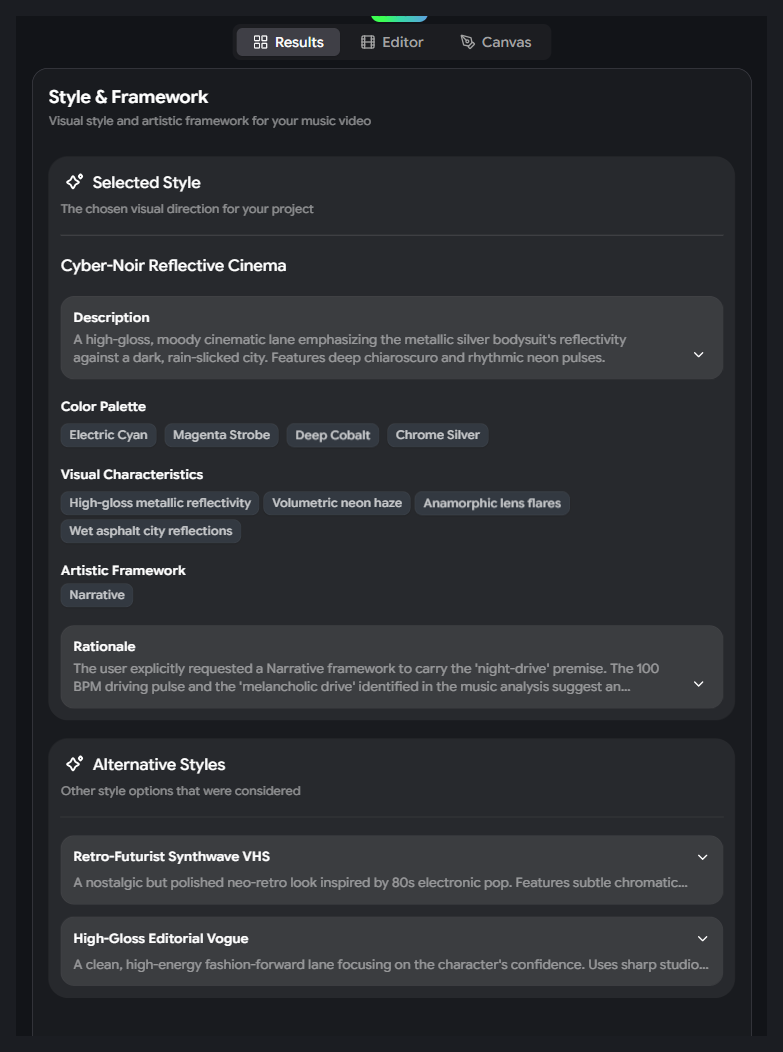
Read this panel as a creative commitment:
Selected Style: the core look freebeat wants to establish.Color PaletteandVisual Characteristics: the repeatable visual language that supports that look.Artistic Framework: the storytelling logic behind the style choice.Alternative Styles: nearby lanes you could have taken instead.
This is the stage where the workflow stops being open-ended and starts becoming a defined visual production path. Ask one direct question: if the full video followed this direction from the first frame to the last, would it still feel right for the song? If the answer is no, correct it here while the shift is still clean. If the answer is yes, the project starts to gain the kind of visual conviction that makes the rest of the workflow feel powerful rather than tentative.
2.5Creative Brief
Read the Creative Brief like you are approving the internal logic of a real piece. If it sounds thin here, it will usually look thin later.
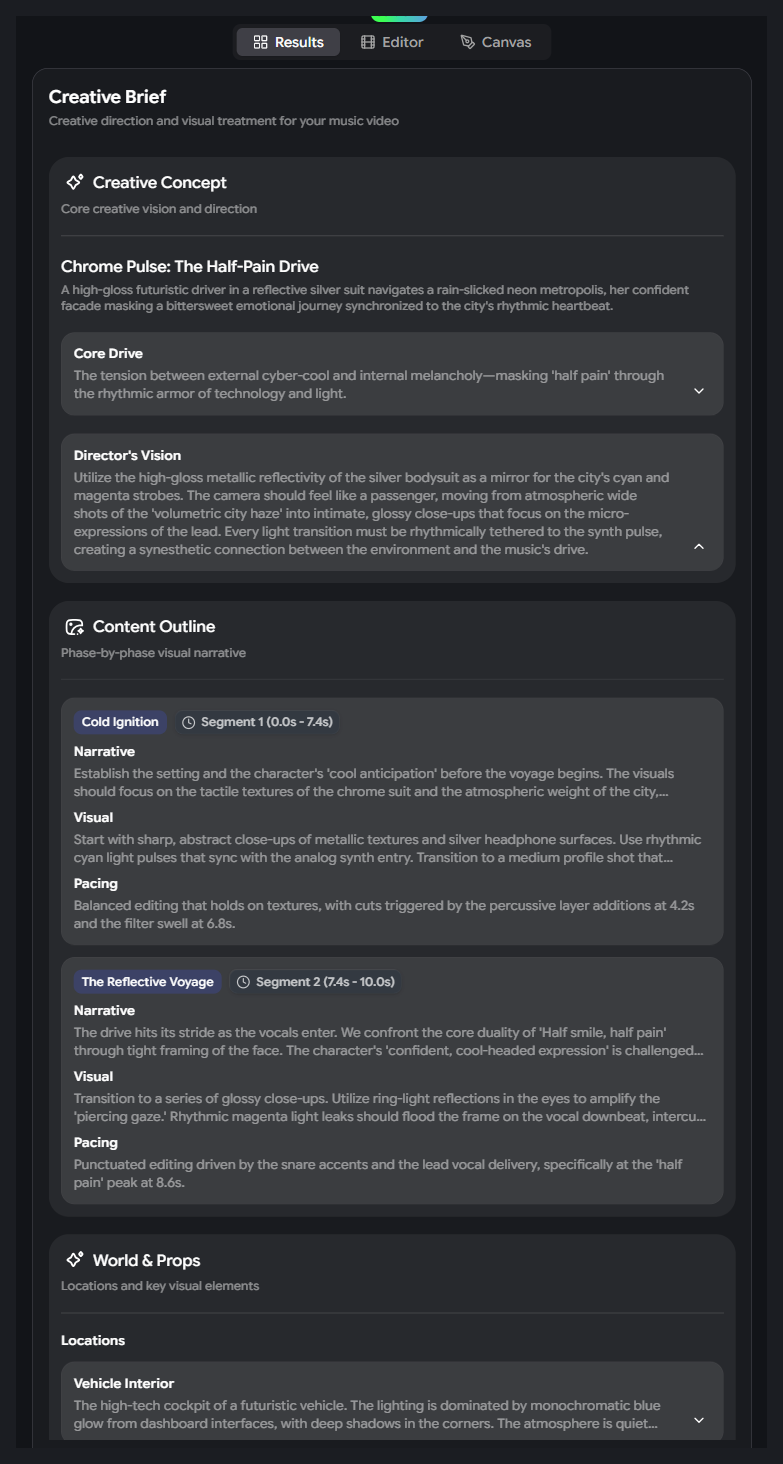
Focus on the four core blocks:
Creative Concept: what the MV is fundamentally about.Core Drive: the emotional engine underneath it.Director's Vision: how the piece should feel on screen.Content Outline: the phased structure that later stages will turn into images and motion.
This is where freebeat turns settings and taste into a coherent point of view. When the brief feels sharp, later stages have something real to build on. When it feels generic, the rest of the workflow usually inherits that softness no matter how polished the output becomes. This is the point where a promising setup starts becoming a piece with intent, direction, and real screen presence.
2.6Reference Images
Open the Reference Images board and judge consistency immediately. The question here is not whether a single card looks attractive. The question is whether the board can support an MV identity strong enough to survive the stages that come next. This is one of the first moments where the project starts looking like a world instead of a collection of guesses.
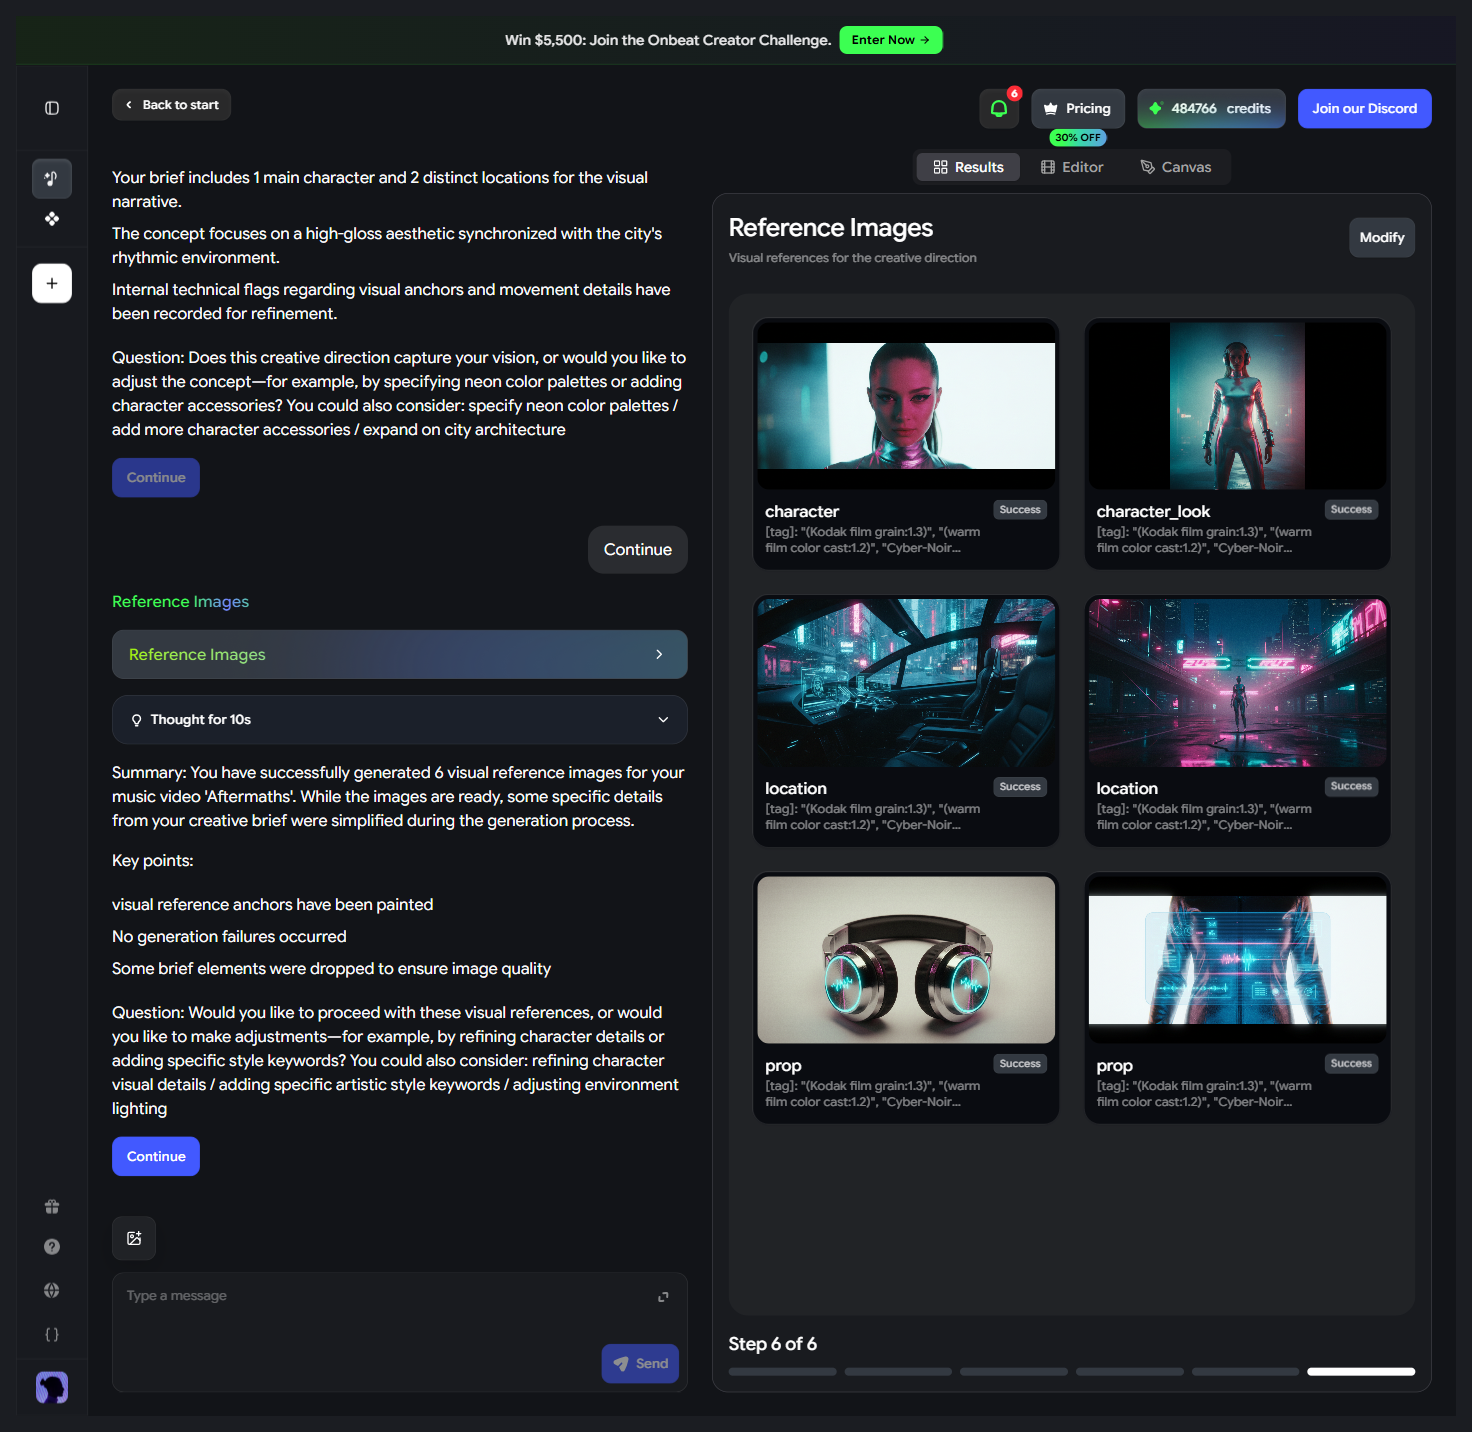
Review the board as one system:
- Does the lead subject still read as the same person?
- Do the styling, environment, and props belong to one coherent world?
- Is there any card that is clearly weaker, noisier, or less on-brief than the others?
If identity drift or world drift appears, use Modify now. This is one of the cleanest correction points in the entire workflow, because later planning and generation stages will only amplify whatever this board establishes. When this board holds together, the project gains the kind of visual authority that makes the later stages feel exciting instead of fragile.
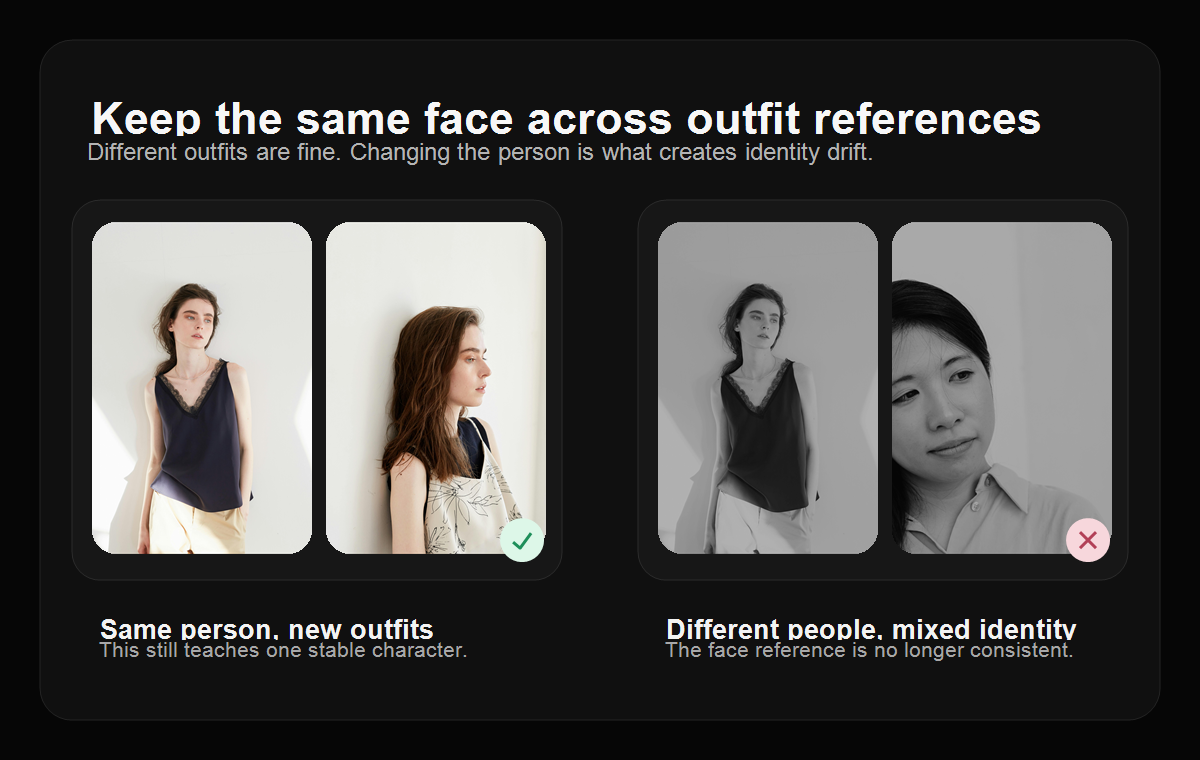
If you are preparing your own source images for Character at the start of the session, keep the identity signal clean:
- One person only. Every source image should make the subject unmistakable at first glance. Group shots and ambiguous framing weaken the signal.

- Use a clean background and a clear face. The easier the subject is to read, the more stable the result usually becomes.
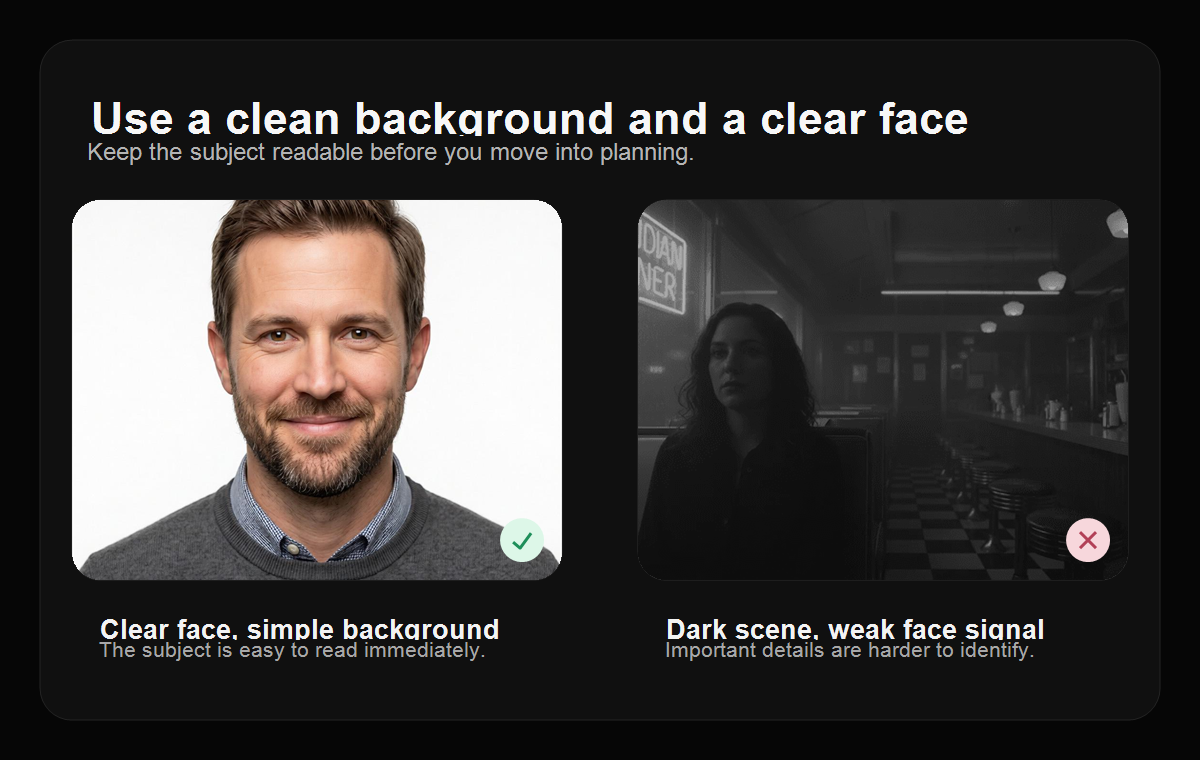
- Keep the same face across outfit references. Different styling is fine. Different people are not. That is where identity drift begins.
2.7Scene Planning
Read Scene Planning as the macro structure of the MV. This is where you decide whether the song's biggest turns are being given enough visual scale before the workflow gets more detailed.
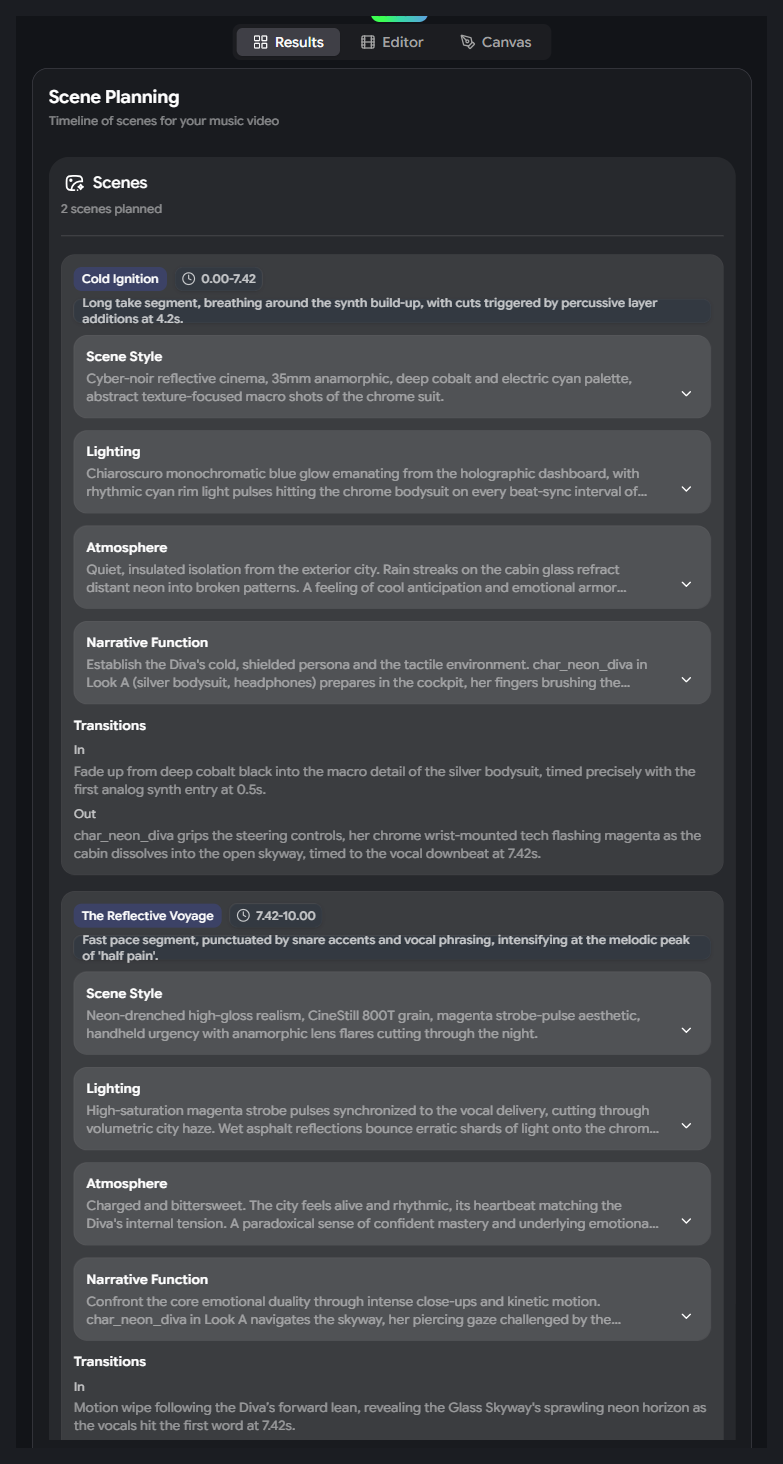
Review from large scale to small scale:
- Start with the scene names and time ranges.
- Then read
Scene Style,Lighting,Atmosphere, andNarrative Function. - Finally, check the transitions and decide whether the movement between scenes feels musically earned.
This stage is where freebeat decides how the track expands into major visual units. If the structure feels too compressed, too fragmented, or late on an important musical turn, fix it here. Pacing is far easier to correct at scene level than after it has hardened into shots, boards, and clips. When this stage is right, the MV starts to feel like it has scale, rhythm, and real cinematic scope.
2.8Shot Planning
Read Shot Planning in sequence and make sure the camera language is progressing instead of repeating. This is the stage where the MV starts becoming directable shot by shot rather than merely describable in broad strokes.
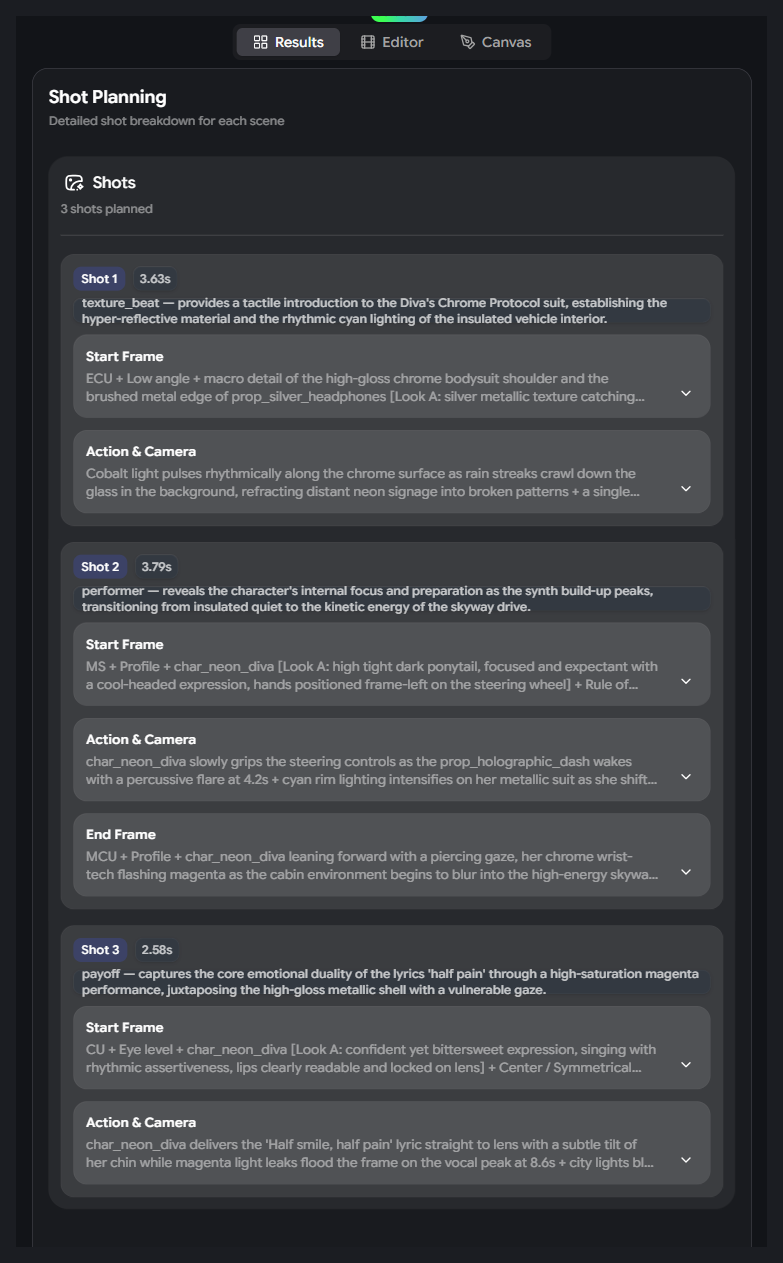
Check each shot for three things:
Start Frame: how the shot enters.Action & Camera: what moves and how the camera behaves.End Frame: what the shot resolves to.
If too many cards feel interchangeable, vague, or rhythmically flat, stop here. Repetition is cheap to remove at the planning stage and expensive to remove after those decisions have already turned into storyboard images and motion clips. This is where the video gains directability, momentum, and the shot-to-shot contrast that makes a finished MV feel intentional.
2.9Storyboard
Use Storyboard to judge the project visually for the first time as a sequence, not just as a plan. In the live result panel, the board itself is titled Scenes, and this is often the first moment the MV starts to feel unmistakably real.
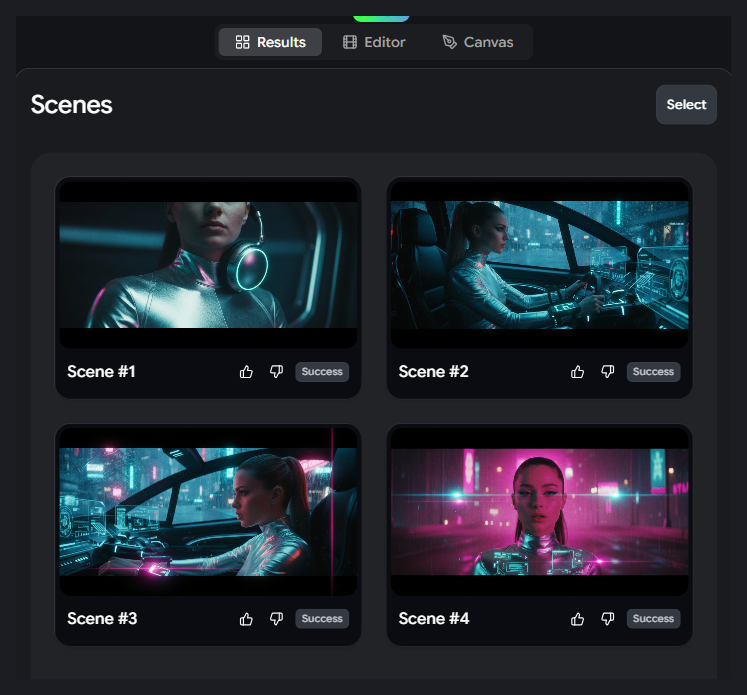
Read the board from left to right and ask:
- Does the sequence still feel like one coherent MV world?
- Does the lead subject remain recognizable from frame to frame?
- Is any card obviously broken, weak, repetitive, or off-brief?
If a frame is wrong, fix it here. Use Select, choose the weak frames, and regenerate them before you move on. Storyboard is where precision pays off hard, because every repaired frame improves the clips that will later carry motion, rhythm, and emotional weight. When this board clicks, the project stops feeling theoretical and starts feeling like something you could actually release.
Recommendedcorrect storyboard drift the moment you see it, while the fix is still precise and inexpensive.
Not recommendedcarrying broken storyboard cards into Video Clips and expecting motion to solve a design problem upstream.
2.10Video Clips
Open the Videos grid, then watch the clips that matter most. Do not approve this stage from thumbnails alone. This is the point where the project stops being imagined motion and starts becoming actual movement against the track.
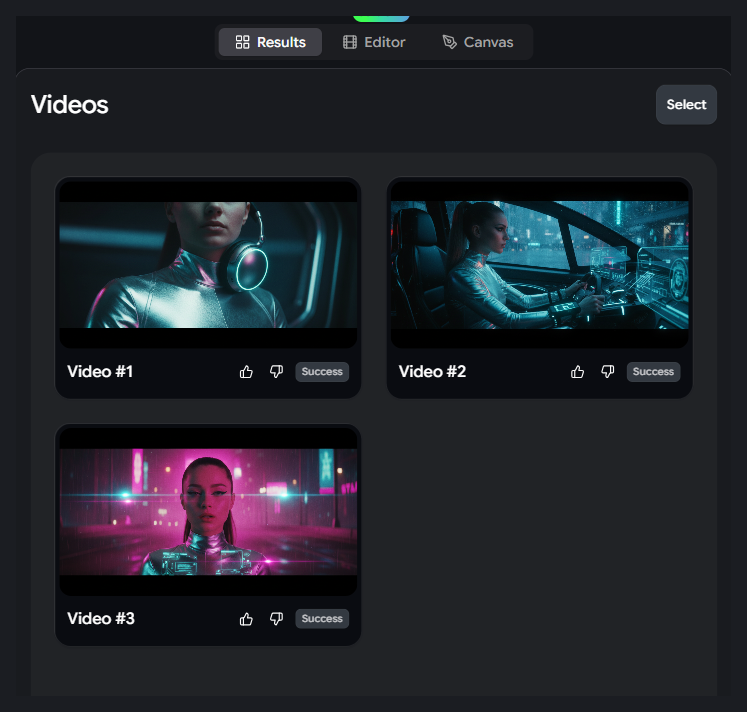
Judge the stage in two passes:
- First, scan the clip cards and make sure the major beats are all represented.
- Then open the clips that matter most and decide whether the motion itself is convincing, not just the still preview.
If a clip misses, regenerate selectively. By this point, the strongest workflow is surgical, not broad. Replace the weak clips, keep the strong ones, and do not reset more than the problem actually requires. This is where freebeat starts paying off in the most satisfying way: the work is moving, the music is carrying it, and your earlier decisions are now returning visible momentum on screen.
Do not stop at the clip grid. Switch to Editor and watch the sequence on the timeline.
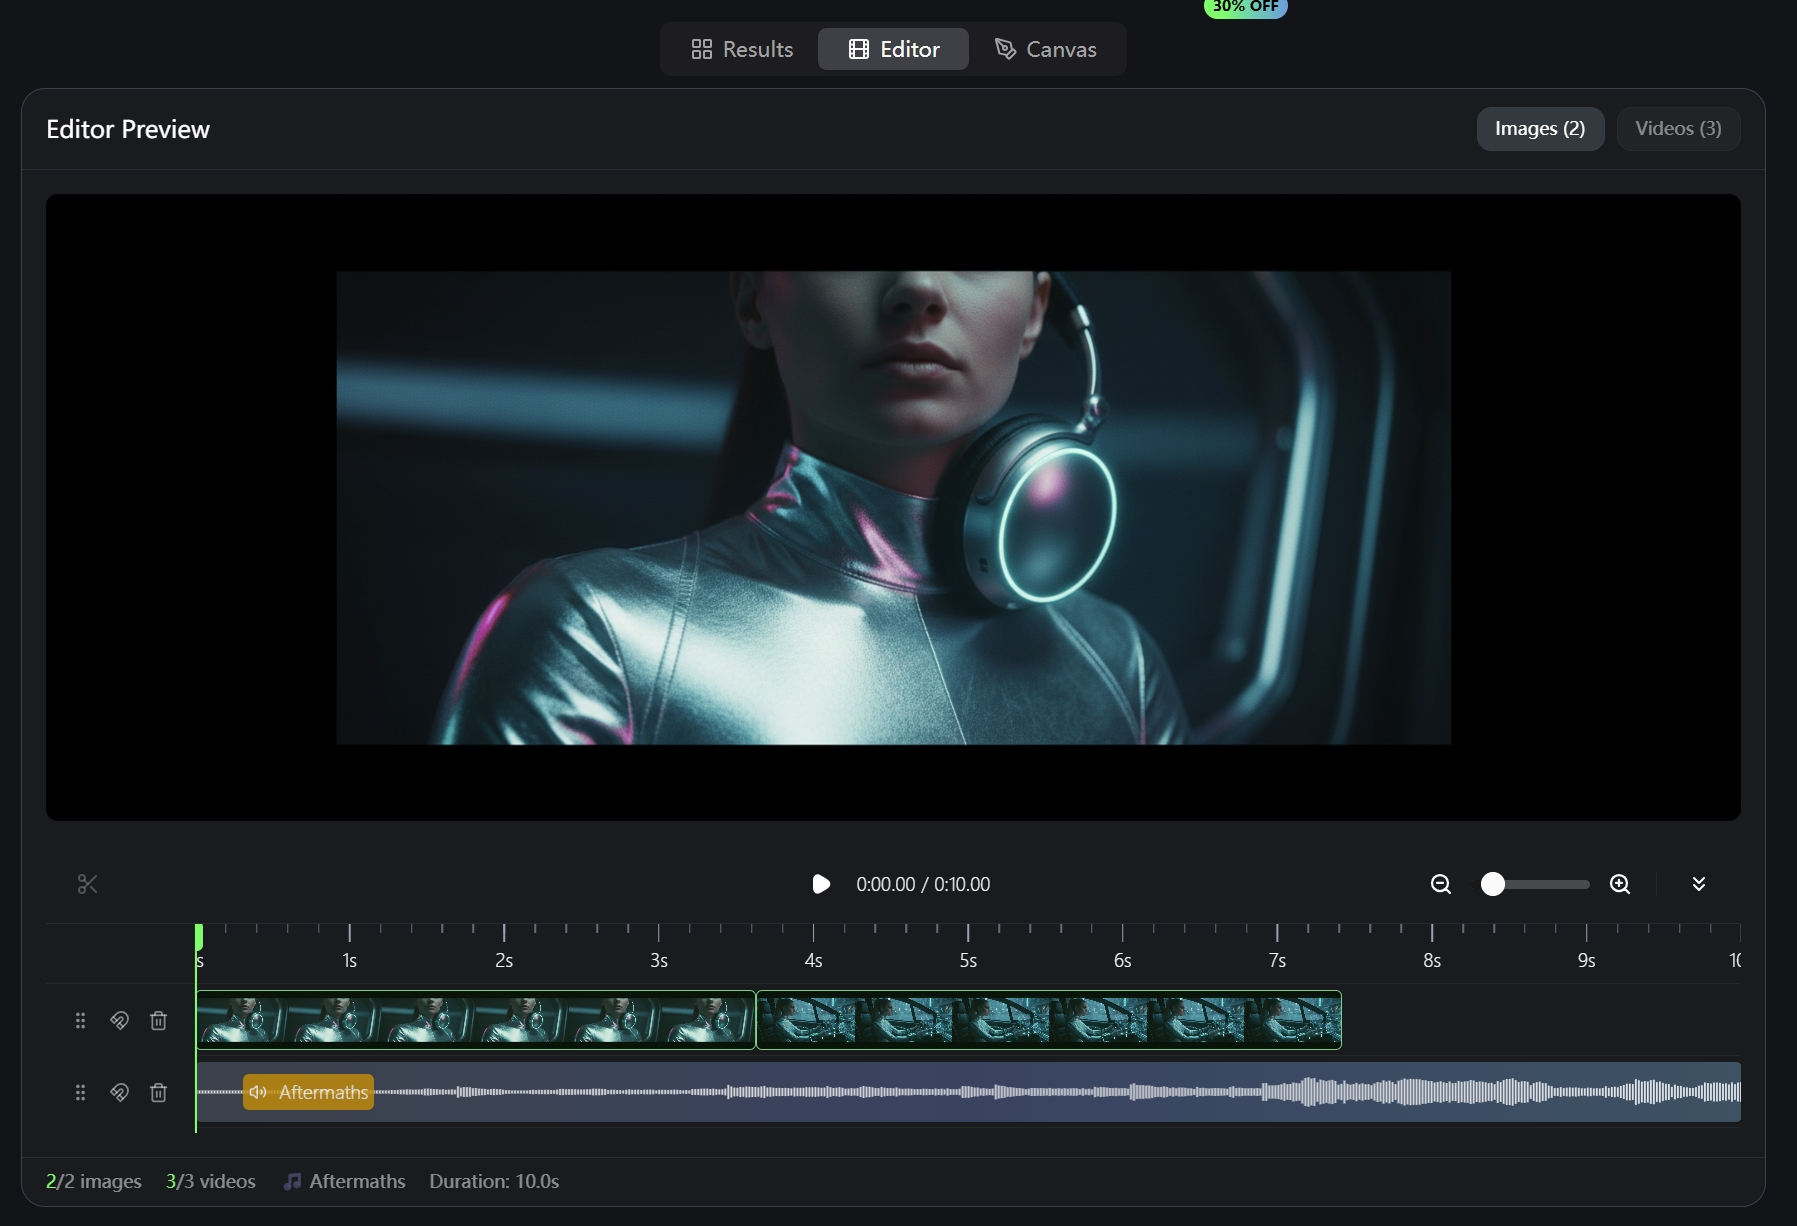
Editor is where timing truth becomes obvious. A clip that looks excellent as a card can still feel late, flat, rushed, or rhythmically wrong once it plays in sequence against the waveform.
2.11Merge
Use Merge to judge the complete MV as a finished piece. In the result panel, this stage appears as Final Video, and this is where the whole session resolves into one playable work.
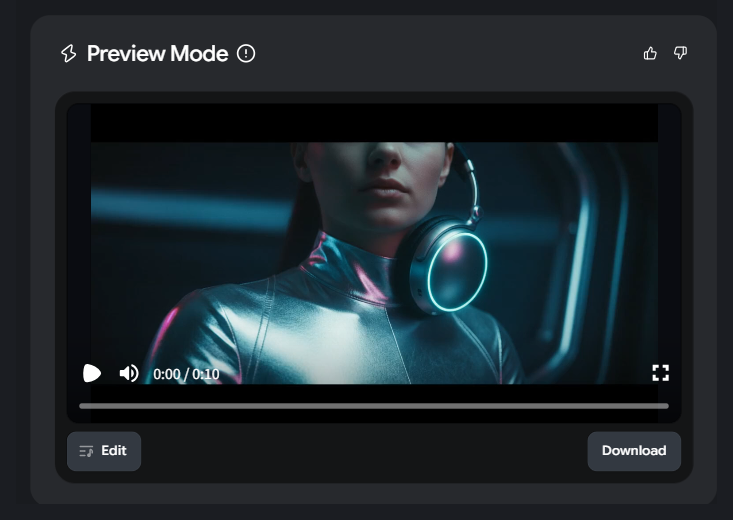
Watch the result once as a complete video, not as a checklist of individual assets.
Use the final screen in this order:
Preview Mode: watch the full result without interrupting yourself.Edit: go back into the editor if the sequence still needs work.Download: export only when the MV feels finished, not merely render-complete.
If the final preview still is not there, return to the earliest stage that introduced the problem. Merge can complete a strong project, but it cannot rescue a weak upstream decision. When the upstream decisions are right, though, this stage gives you the feeling the whole workflow has been building toward: not relief that something finally rendered, but the satisfaction of seeing a full MV land with confidence, shape, and weight.
3Revise Without Wasting Time
When a project drifts, do not restart by default. Go back to the stage that actually owns the problem and correct it there. That is how strong creators protect quality without throwing away momentum, time, or credits.
This is one of the biggest advantages of freebeat Agent's staged design. Each step has a clear job, and that means each problem usually has a best correction point. The smartest revisions are not broad. They are targeted, early enough to matter, and precise enough to preserve what is already working. That is what keeps the workflow feeling powerful: you are not trapped inside a black box, and you are not reduced to starting over every time something slips. You can keep the parts that are already landing and strengthen only the part that is holding the MV back. That is not just efficiency. It is one of the clearest signs that you are working with real creative control.
| If this is the problem | Go back here first | Why this is the right stop | What to do |
|---|---|---|---|
| The subject stops looking like the same person | Character or Reference Images | Identity problems usually begin at the source or at the image anchors. | Tighten the source images, then correct the reference board before moving on. |
| The pacing feels musically wrong | Music Analysis or Scene Planning | Timing drift usually starts before any frames are generated. | Recheck the energy arc, segment splits, and scene timing. |
| The look is polished but wrong for the song | Style & Framework | That is where freebeat commits to the visual lane. | Change direction there instead of trying to patch it later. |
| The brief sounds clever but the visuals still feel generic | Creative Brief | Later stages inherit the strength or weakness of the concept. | Tighten the concept, emotional drive, and phased outline. |
| One or two storyboard cards are broken | Storyboard | This is the cleanest place to repair specific visual misses. | Use Select, regenerate only the weak frames, and review again. |
| One or two clips are weak in motion | Video Clips | The clip stage owns motion quality. | Regenerate only the weak clips, then recheck them in Editor. |
| The whole MV feels uneven in playback | Editor, then the earliest bad upstream step | Playback exposes problems that thumbnails can hide. | Identify the weak moment, then trace it back to the stage that created it. |
| The final preview still is not ready to ship | The earliest stage where it first went wrong | Merge only combines what came before it. | Fix the source issue upstream, then merge again. |